
From your WordPress dashboard, navigate to Cookie Consent > Cookie Settings > General.
General #
The General tab in the Cookie Consent section allows you to configure fundamental cookie banner behavior and compliance options for your website. Here’s how each setting works:
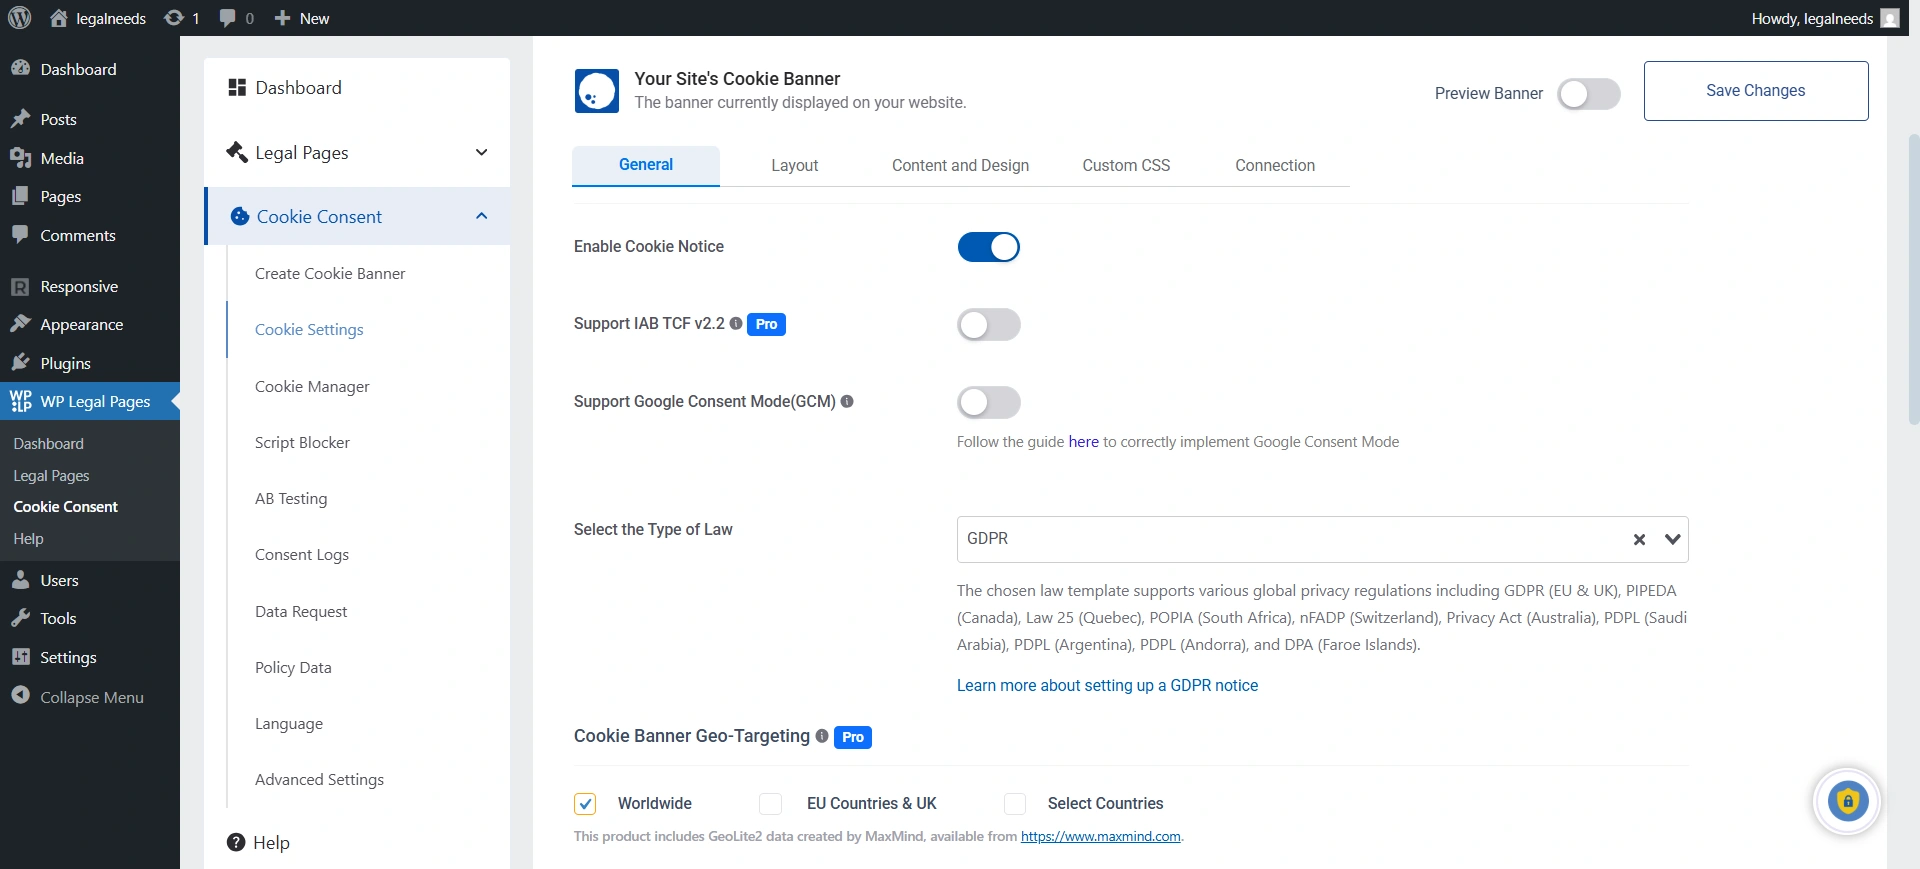
1. Enable Cookie Notice
Turn this option ON to activate the cookie consent banner on your website. When enabled, visitors will be prompted to accept or manage cookies as per your chosen configuration.
2. Support IAB TCF v2.2
Enable this setting if you want your site to follow the IAB Transparency and Consent Framework (TCF) v2.2. Advertisers and publishers widely use this standard to manage consent for personalized ads in compliance with GDPR and other regulations.
3. Support Google Additional Consent Mode
This works along with IAB TCF v2.2. If you are not registered with the IAB TCF and are running Google Ads or other Google services that require user consent, enabling this setting ensures your site communicates consent signals correctly to Google for compliance and ad serving purposes.
4. Support Google Consent Mode (GCM) v2
Enables Google Consent Mode v2, allowing your site to share user consent choices with Google services (like Ads and Analytics). This ensures that ad personalization and measurement features remain compliant with privacy laws.
Enable this if you use Google Ads, Google Analytics, or any other Google marketing tools.
Know more about Google Consent Mode and how to use it.
5. Select the Type of Law
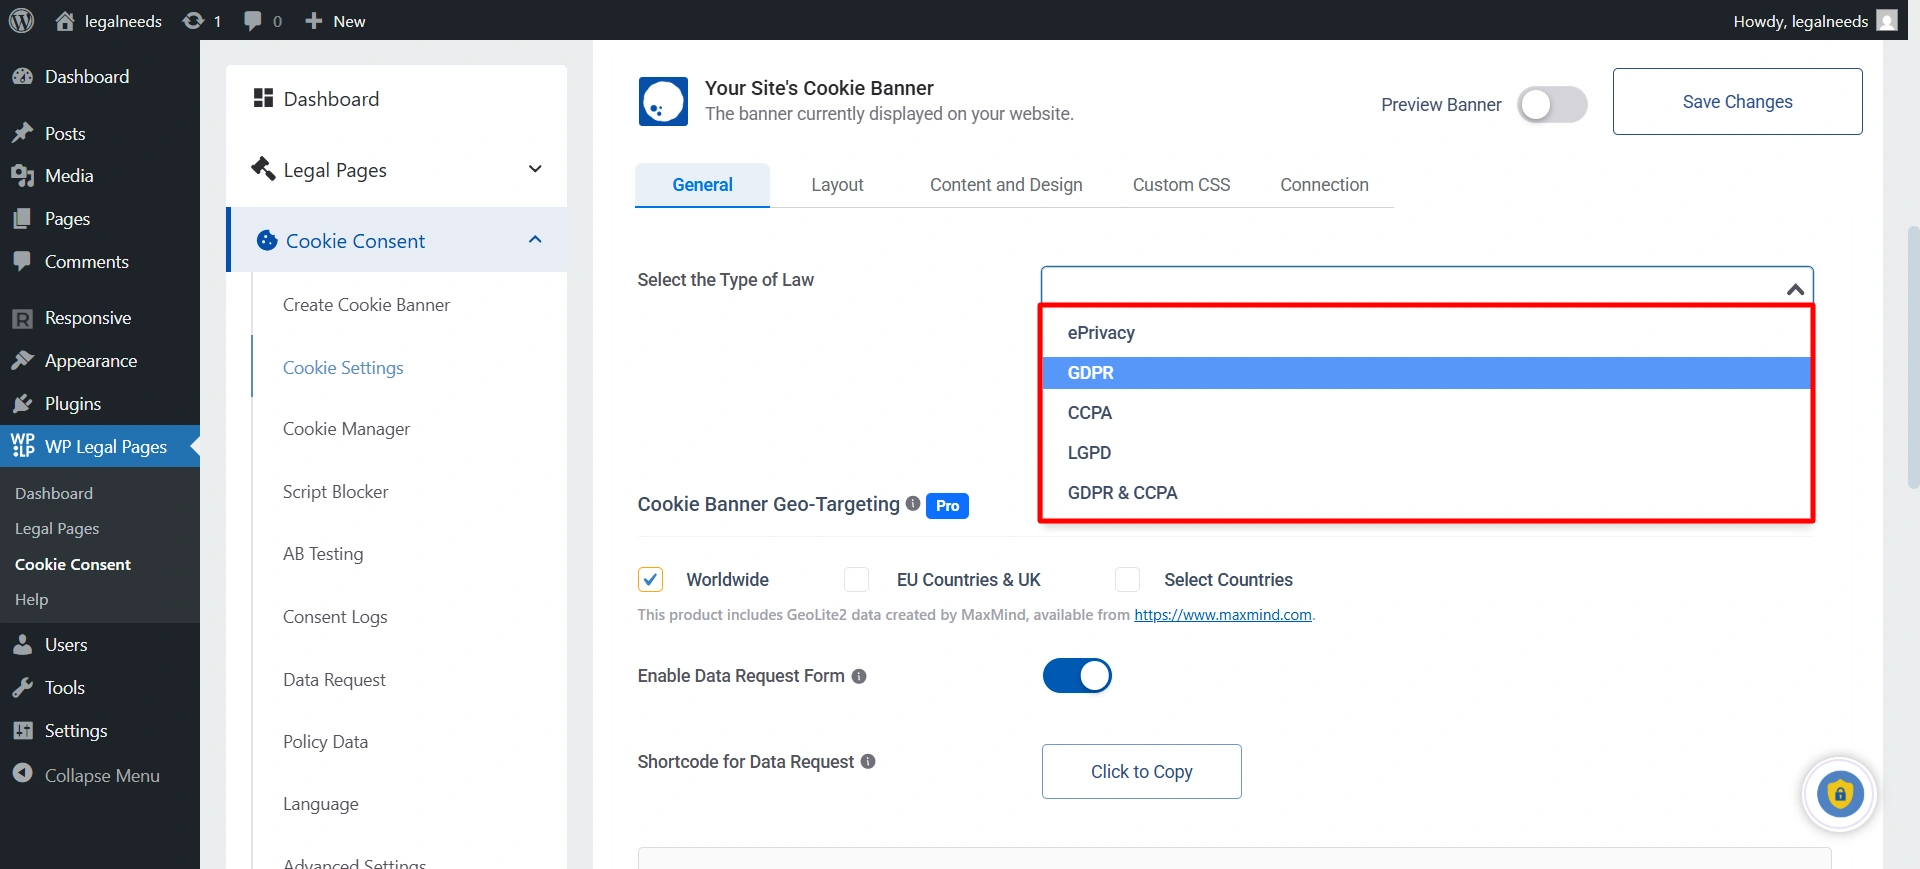
Choose which privacy law(s) apply to your website visitors, such as ePrivacy, GDPR, CCPA, or LGPD. This helps configure the banner to meet specific legal requirements.
Information Note: A short description below the dropdown explains which regulations the selected template supports, along with a link for more information on GDPR notices.
6. Banner Initialization
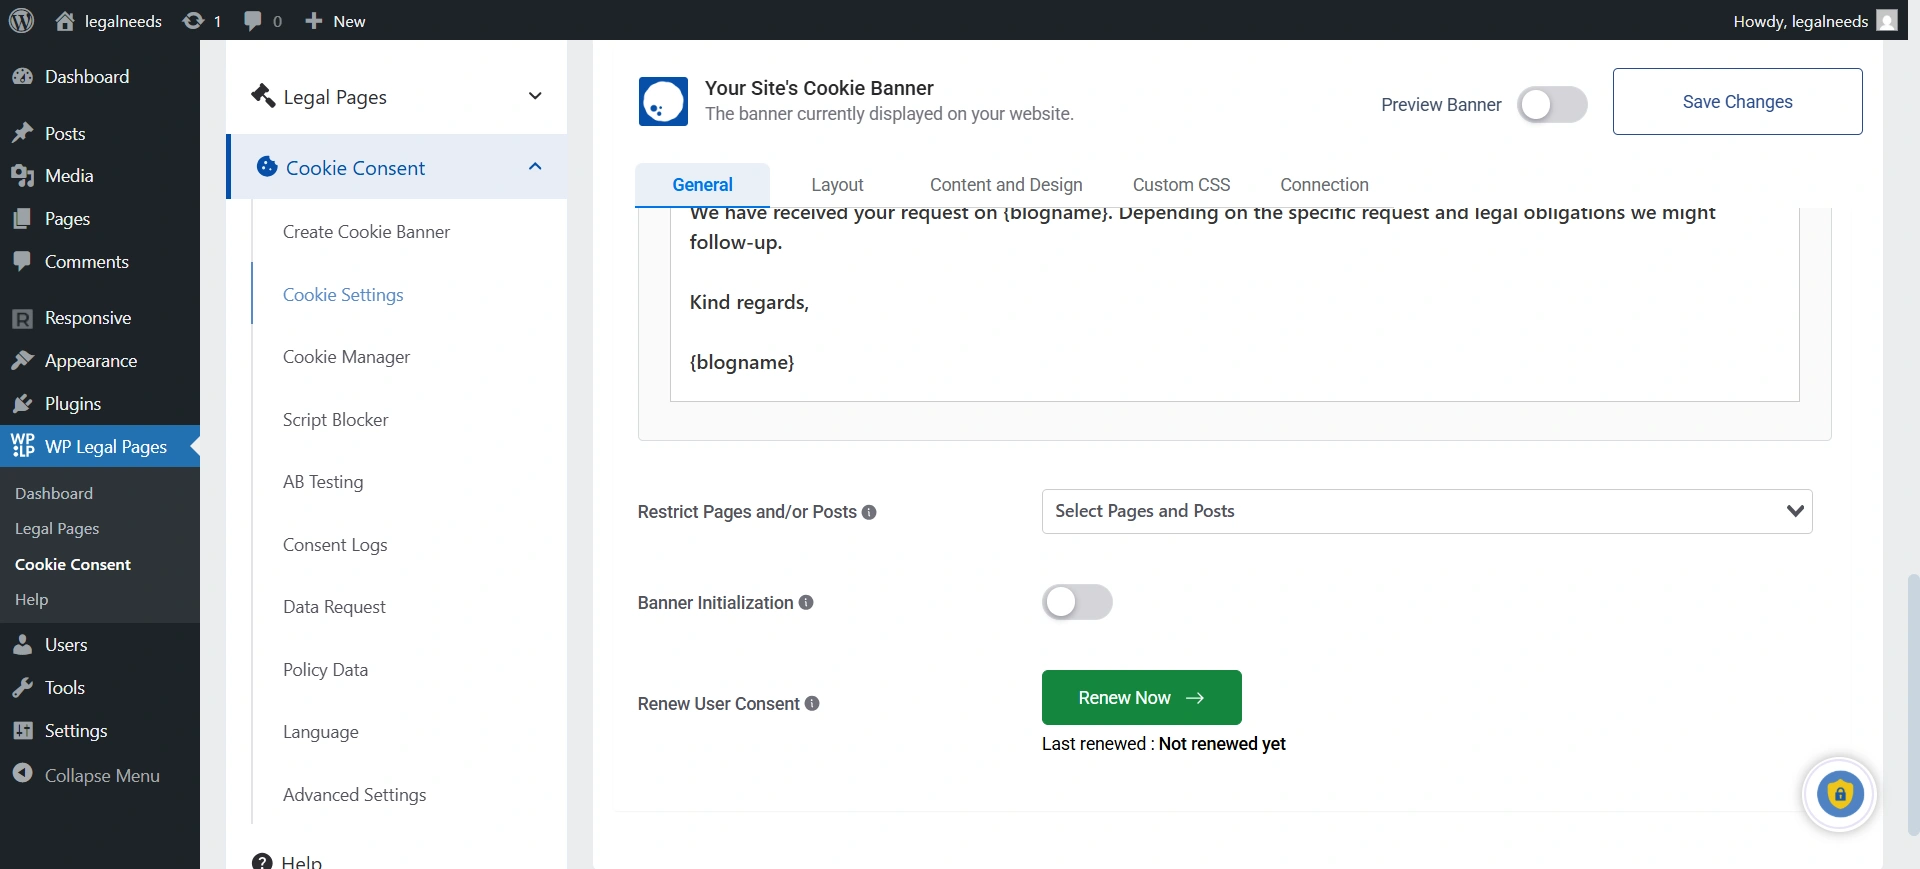
When enabled, this setting controls whether the cookie banner loads immediately when the site opens or after a few seconds.
7. Renew User Consent
If you’ve updated your policy, you can enable this setting. The cookie banner will reappear on the site, prompting the user to provide consent again.
8. Hide Cookie Banner on Specific Pages
This lets you prevent the cookie banner from showing up on certain pages, like your “Terms of Service” or “About Us” page.
9. Cookie Banner Geo-Targeting
This is a handy feature. Instead of showing the banner to everyone, you can choose to only show it to visitors from specific regions, like the EU Countries & UK, or other specific countries. This helps you comply with laws only where they apply, without bothering visitors from places where a cookie banner isn’t legally required.
10. Preview Panel
To the right, you’ll find a live banner preview and toggle options to see how your cookie consent banner will appear on various device screens.
Layout #
The Layout tab in the Cookie Consent section allows you to customize the appearance and placement of your site’s cookie banner, so it matches your branding and user experience preferences.
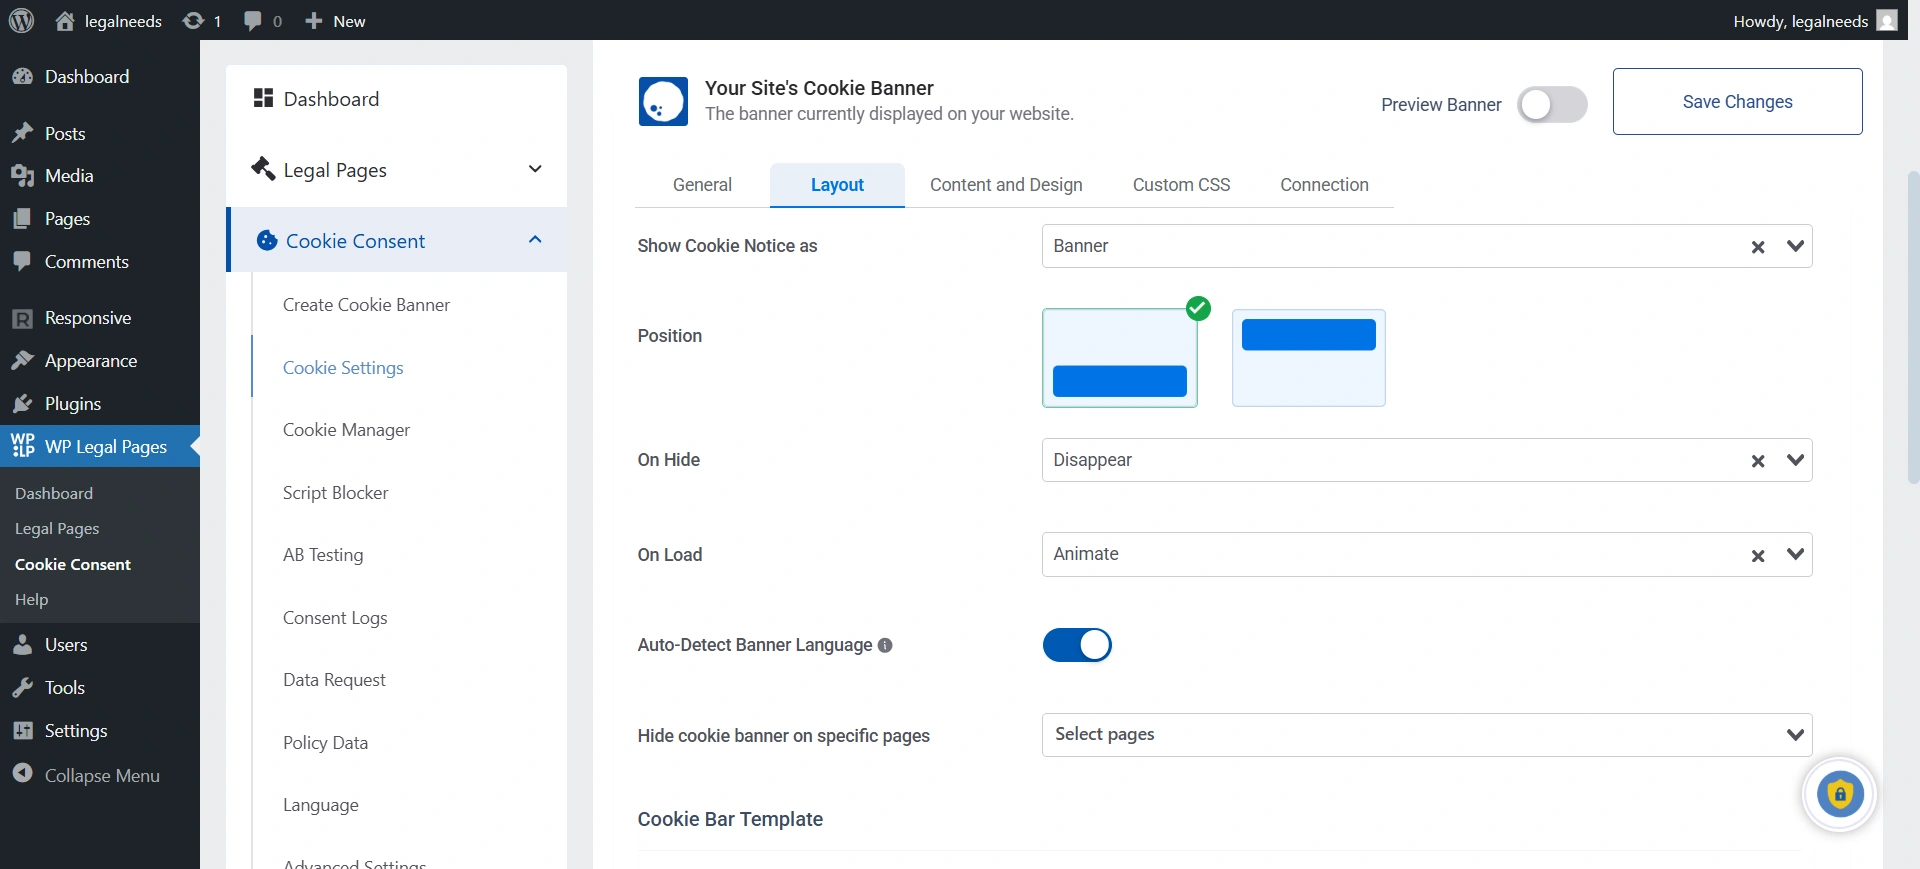
1. Show Cookie Notice as: This is where you choose the style and placement of your cookie banner, whether you want to display it as a banner, pop-up, or widget.
- Banner: Typically shown at the top or bottom of the website.
- Popup: A modal-style notification that appears over content.
- Widget: A smaller, docked element that can be placed in a corner of the site.
2. Position: Choose how the selected banner, popup, or widget is positioned on the page.
3. On Hide: This setting controls how the banner disappears after a user interacts with it.
4. On Load: This option determines how the banner first appears when a visitor lands on your page.
5. Auto-Detect Banner Language: Toggle this setting to allow the banner to automatically detect and display in the user’s browser language when supported.
6. Auto-Generate Banner: It allows the plugin to automatically create a cookie consent banner for your site based on your theme.
7. Cookie Bar Template: This is where you can choose a pre-designed look for your banner. When you click on Explore More Options, you get nine professionally designed cookie banners. This makes it easy to match the look of your website without needing to create it from scratch.
8. Template Preview: The right-side preview panel allows you to visualize your banner, popup, or widget (on desktop or mobile) before making changes live.
Content and Design #
The Content and Design tab enables you to fully customize the text, links, and visual appearance of your cookie consent banner. Each section below lets you control both the content displayed to users and how the banner looks across your site.
Cookie Notice Message
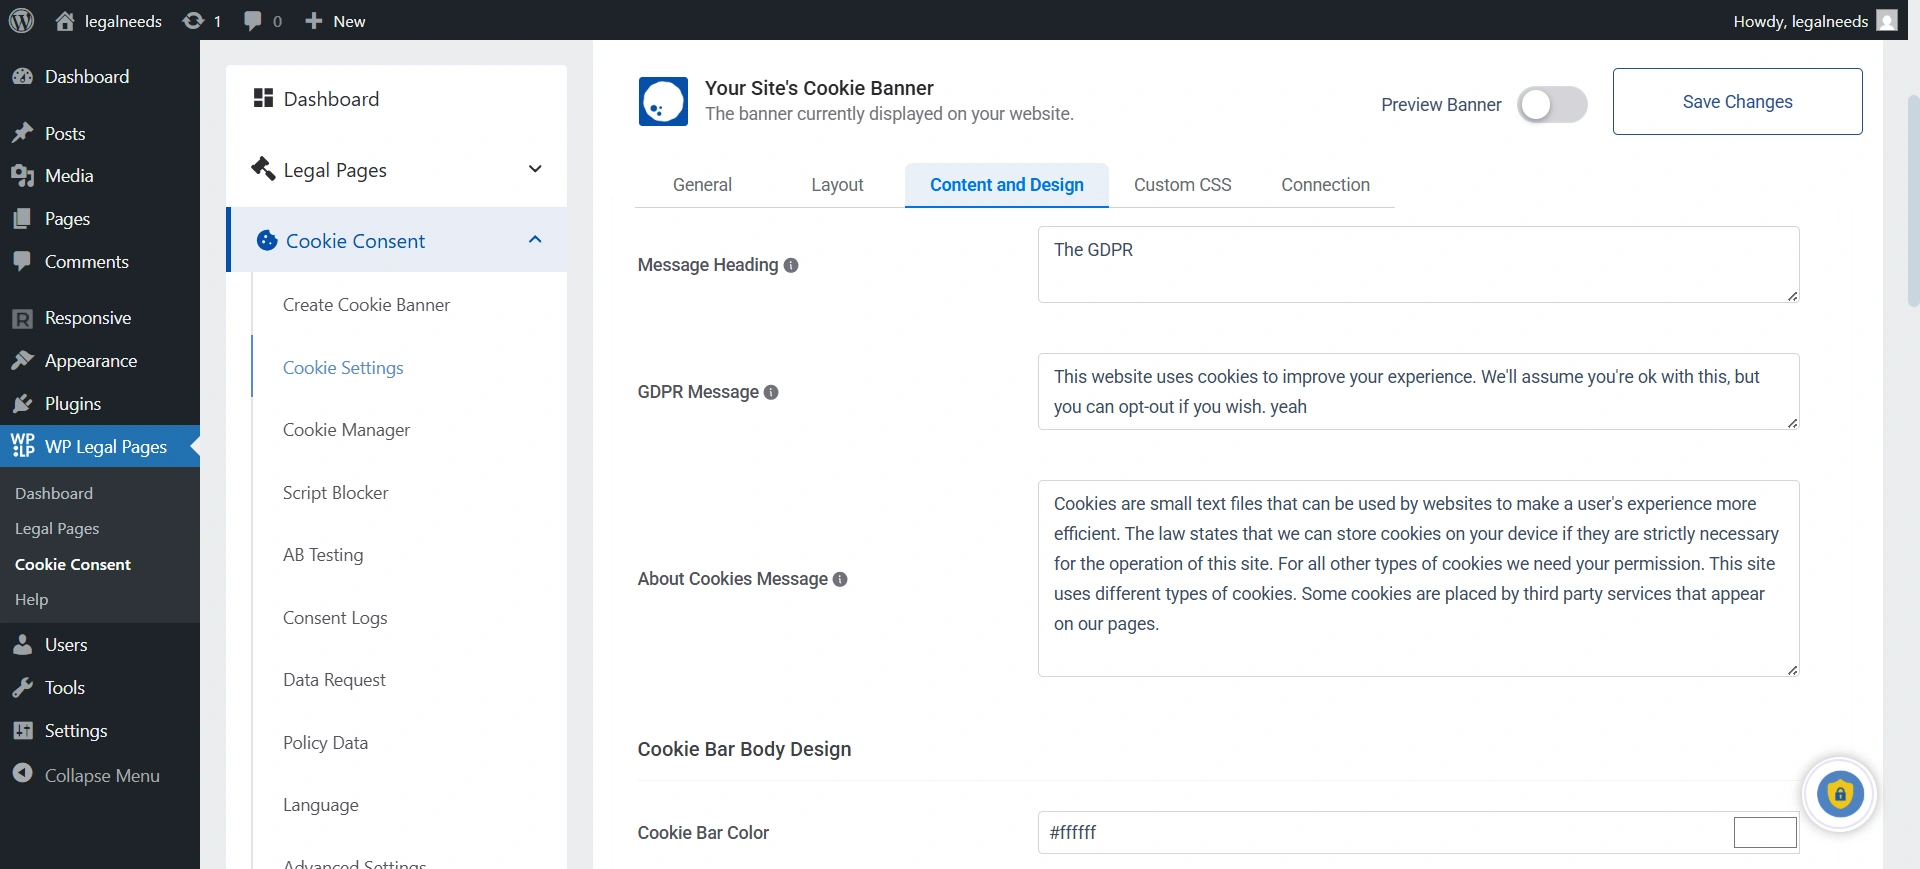
1. Cookie Banner Heading: Set a headline for your cookie notice banner. This appears prominently on the banner and captures visitor attention.
2. GDPR Message: Enter the message informing users about cookie usage on your site, as required by GDPR and privacy regulations. This text typically reassures users about your practices and how they can control their consent.
3. About Cookies Message: Add more detailed information about cookies and how they are used. This can help users better understand your data practices and reinforce transparency.
Privacy Policy Settings #
Customize how the privacy policy is connected to your cookie banner.
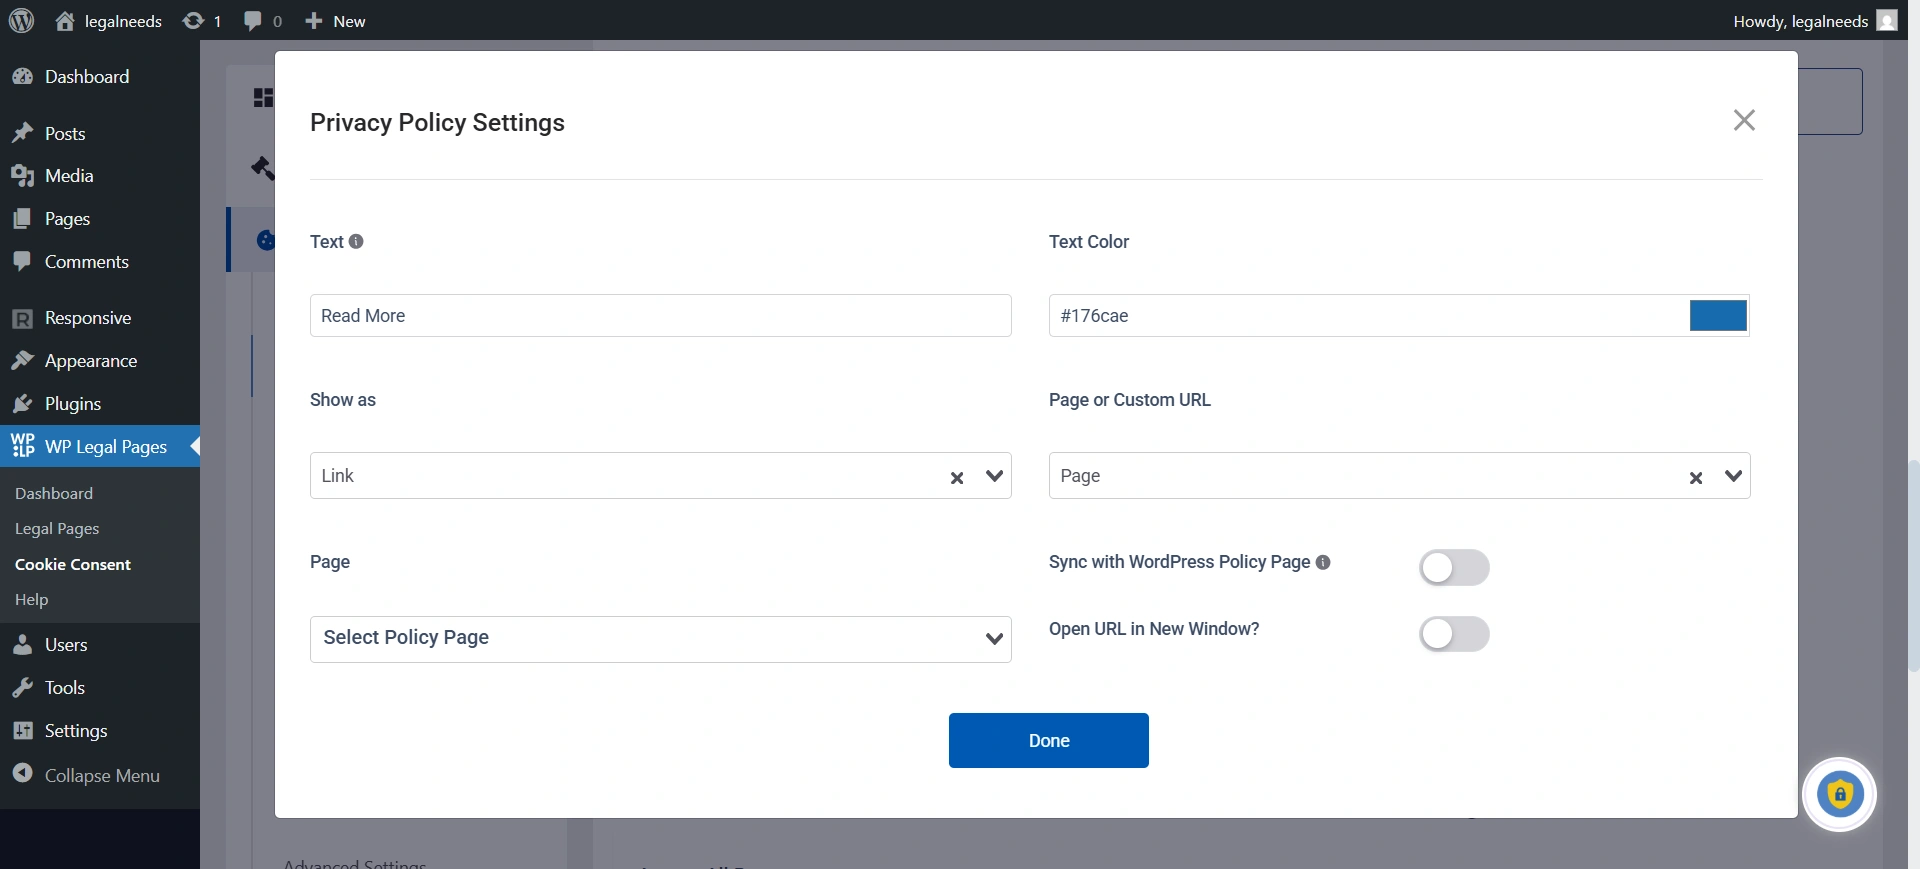
1. Enable Privacy Policy Link: This is a critical setting. When you turn it on, a link to your privacy policy page is added to the cookie banner. This is a legal requirement in many places.
2. Text: You can write the text that you want to display on the link (like the “Read More”).
3. Show As: You can choose whether this link appears as simple text or as a button.
4. Page or Custom URL: This is where you connect the link to your actual privacy policy. You can either select a page that already exists on your website or paste in a custom link.
5. Page: (If you select page) In this, select the policy page, and if you choose the Custom URL, it will show you the option to paste the URL.
6. Sync with WordPress Policy Page: It automatically connects your cookie consent banner to the privacy policy page you have already created within your WordPress site.
7. Open URL in new Window?: Enable this if you want to display your policy page in a new Window.
Revoke Consent #
Let users easily review or adjust their cookie consent preferences.
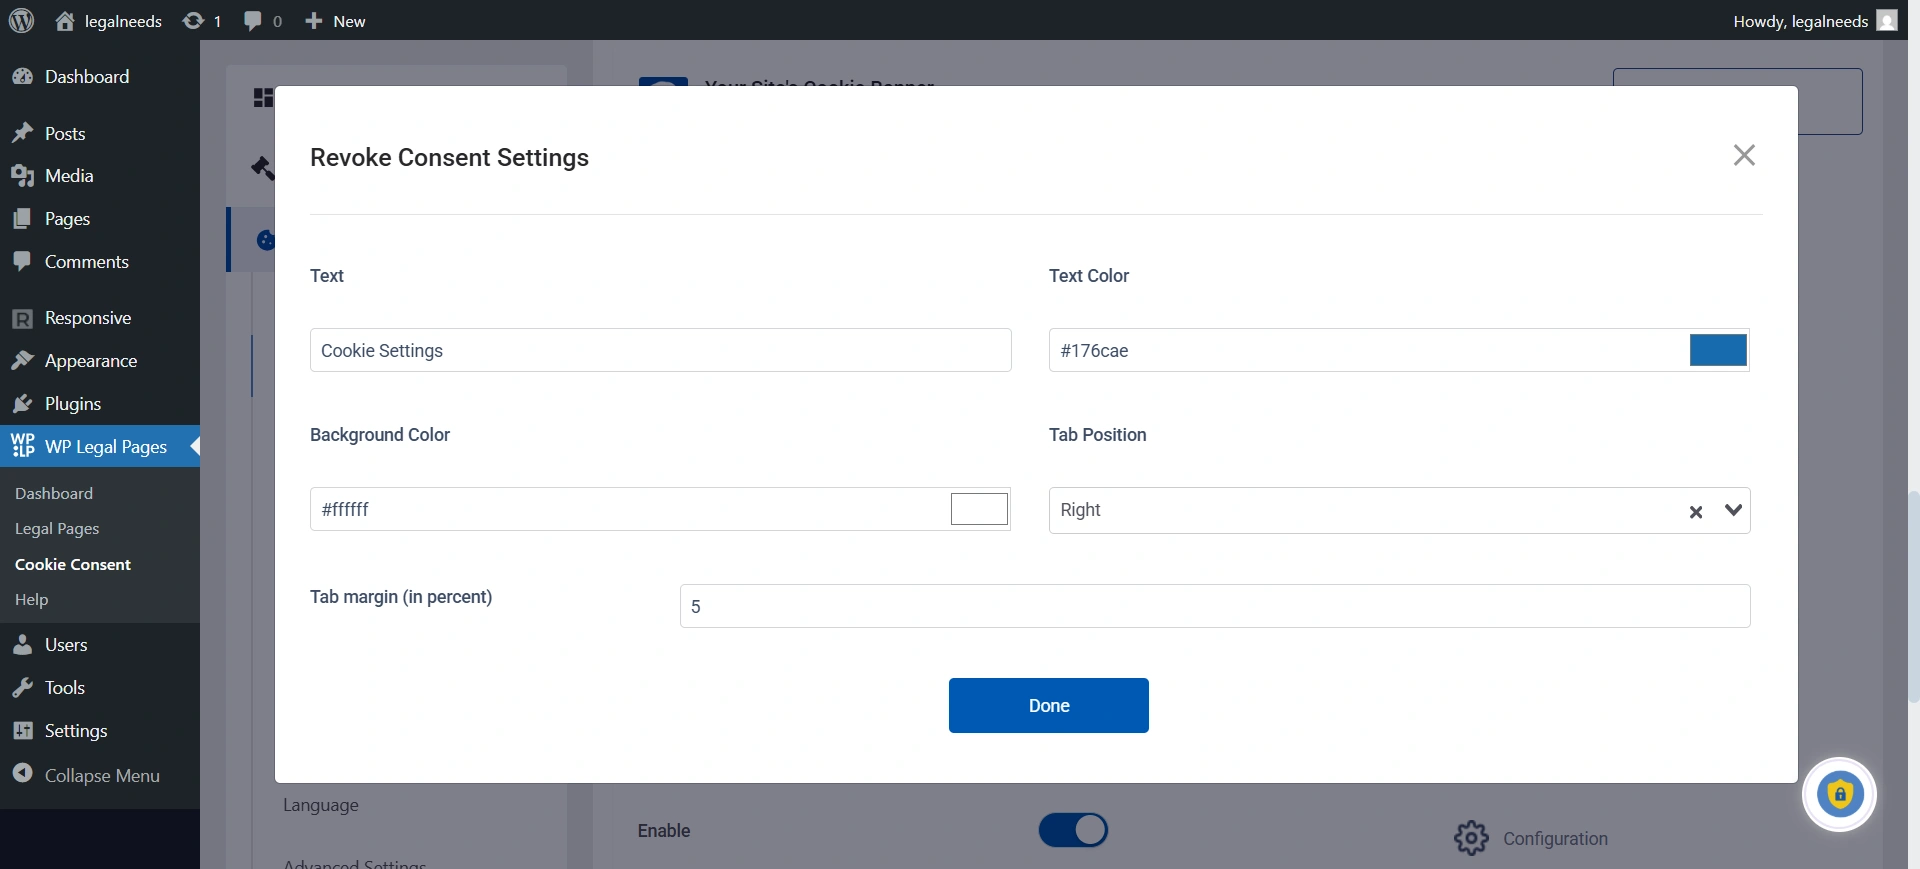
1. Enable Revoke Consent: This is a critical feature for GDPR compliance. It adds a button to your website that allows users who have already accepted cookies to change their mind later and withdraw their consent or vice versa.
2. Tab text: This is the text that appears on the revoke consent tab
3. Text Color: Choose the color of the text displayed on the revoke consent tab.
4. Background Color: Set the background color of the revoke consent tab.
5. Tab Position: Decide where the revoke consent tab will appear on your site.
6. Tab Margin: Adjust the spacing (in pixels) between the revoke consent tab and the edge of the page.
Cookie Bar Body Design #
This section is all about visual customization of your cookie banner.

1. Cookie Bar Color: Set the background color of the cookie banner.
2. Cookie Bar Opacity: This controls how see-through the banner is.
3. Text Color: You can change the color of the text in the cookie banner.
4. Border Width: You can add a border to the banner and control its thickness
5. Border Color: Choose the border color for the banner.
6. Border Radius: You can control the roundness of your cookie banner (Border Radius).
7. Font: You can choose a font for the text on your banner.
8. Upload Logo: This allows you to add your company’s logo to the cookie banner for branding.
Fine-tune which action buttons appear and how they look:
9. Accept Button: If you choose this, it means that users agree to only the essential cookies.
10. Accept All Button: If you choose this, it means allowing users to accept all categories of cookies in one click.
11. Decline Button: If you have this in your cookie banner, that means it lets users reject non-essential cookies while still using the site.
12. Settings Button: Opens detailed cookie settings so that users can customize their preferences.
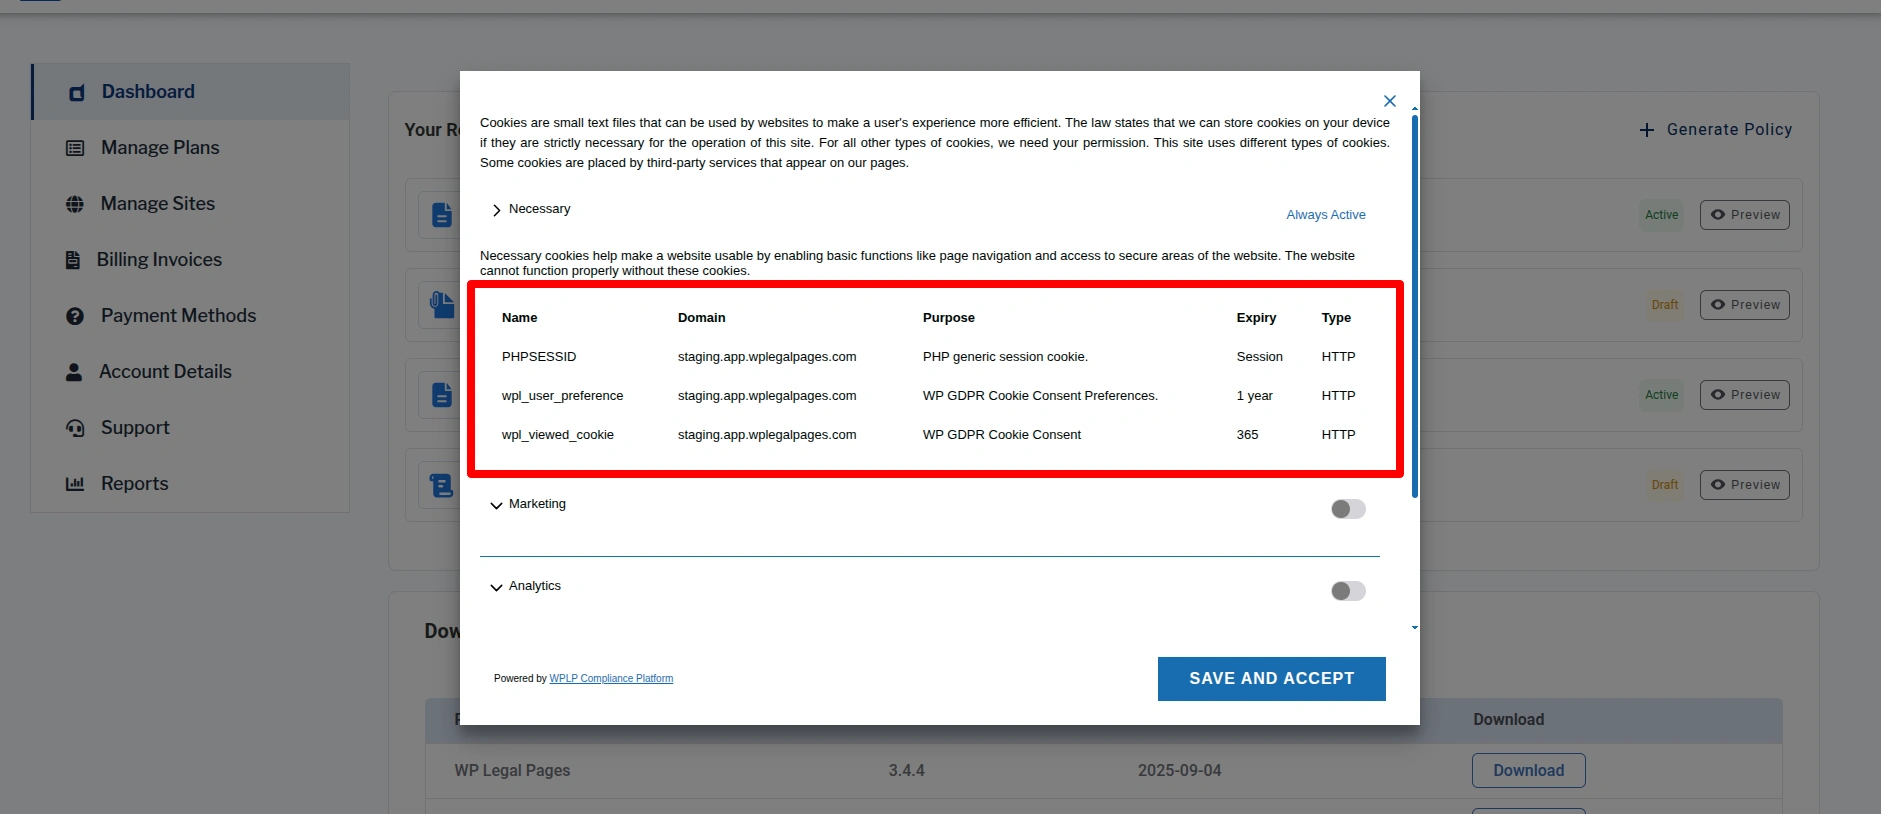
13. Display Cookies List on Frontend: It lets you show all the cookies your website uses directly on a page (like your Cookie Policy). It automatically pulls data from the Cookie List and displays details such as cookie name, purpose, type, and duration. This makes your site more transparent and helps you meet compliance requirements, such as GDPR and CCPA.
To show this, you first need to scan your cookie on your site and then enable the Display cookies list on the Frontend toggle.
14. Live Preview: Use the preview panel on the right to see how your customizations will appear on desktop and mobile.
Custom CSS #
The Custom CSS option lets you add your own CSS code to further style and customize the cookie banner. You can override default styles, such as colors, fonts, spacing, or button design, to make the banner match your website’s branding.
Cookie Manager #
The Cookie Manager tab is your main hub for maintaining an accurate record of all cookies, supporting transparency and compliance with user data regulations. Use automated and manual tools to make sure your website’s cookie policy is always up to date.
1. Restrict Pages and/or Posts: Restrict the pages and posts during scanning of your website for cookies.
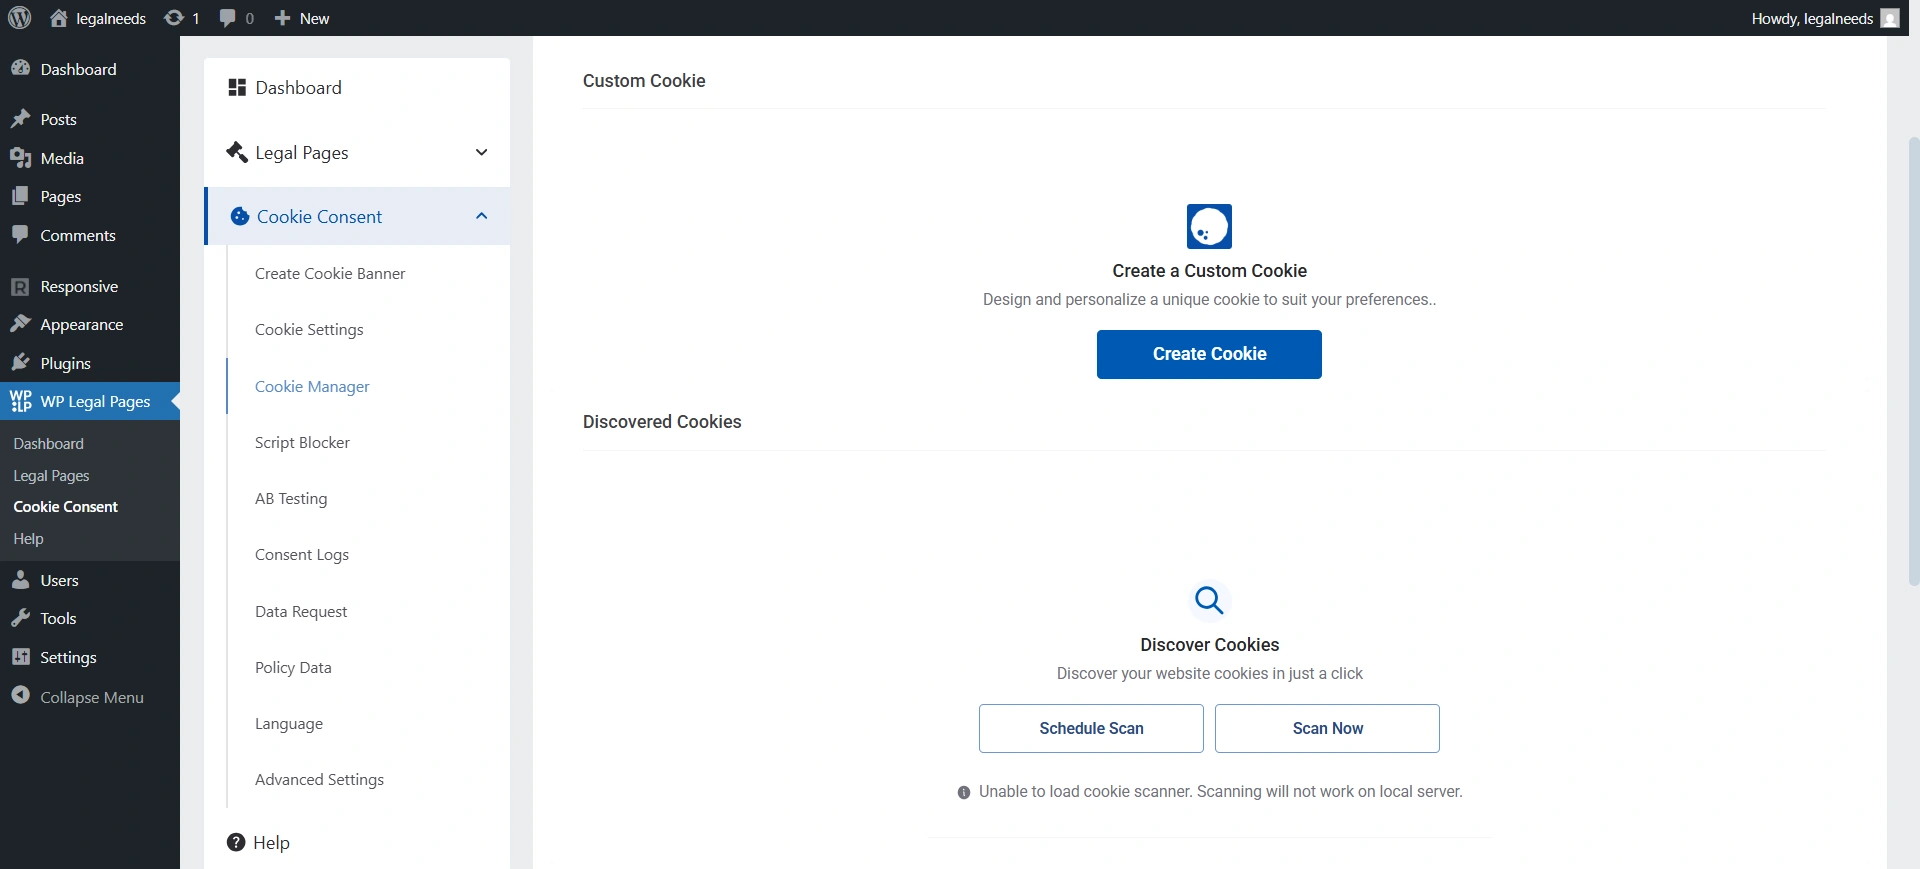
2. Discover Cookies: This feature scans your website to detect what cookies are being used automatically.
It helps you identify all cookies (e.g., analytics, ads, or third-party tools) without manually adding them.
- Scan Now: Instantly start a scan to identify cookies currently in use on your website. This is useful after adding new features or third-party services.
- Schedule Scan: Automate cookie scans by scheduling them to run on specific dates and times.
3. Cookie List: You’ll find all the cookies that have been detected on your site after a scan. Each cookie will include details like name, type, purpose, and duration.
4. Scan History: Keeps a record of all past cookie scans.
- Date and time of scan
- Scan status (Completed/Not Completed)
- Number of URLs scanned
- Number of cookies and categories found
- This provides traceability and helps monitor changes to your site’s cookie landscape over time.
You can track when scans were run and what cookies were found during each one.
Script Blocker #
A script blocker stops non-essential scripts (like Google Analytics, Facebook Pixel, or other tracking/marketing codes) from running on your site until the visitor gives consent. This ensures you’re not collecting data before the user agrees, which is required by privacy laws like GDPR.
1. Script Blocker: If you enable this toggle, all the cookies and scripts will be blocked until a user gives consent.
2. Custom Scripts: Add JavaScript code for non-essential cookies (e.g., Google Analytics). These scripts will only run after the user accepts consent.
3. Header Scripts: Add scripts that should load in the header section of your website, but only after consent is given.
4. Body Scripts: Add scripts that should load within the body of your site after consent.
5. Footer Scripts: Add scripts that should load in the footer section of your site after consent.
6. Script Dependency: Enable this if specific scripts depend on others and should only run when the parent script is allowed.
Want to know more details on Script Blocker? Refer to the doc
Whitelist Scripts
A whitelist is an exception list. It allows you to specify specific scripts or services that should always run, even if the script blocker is enabled.
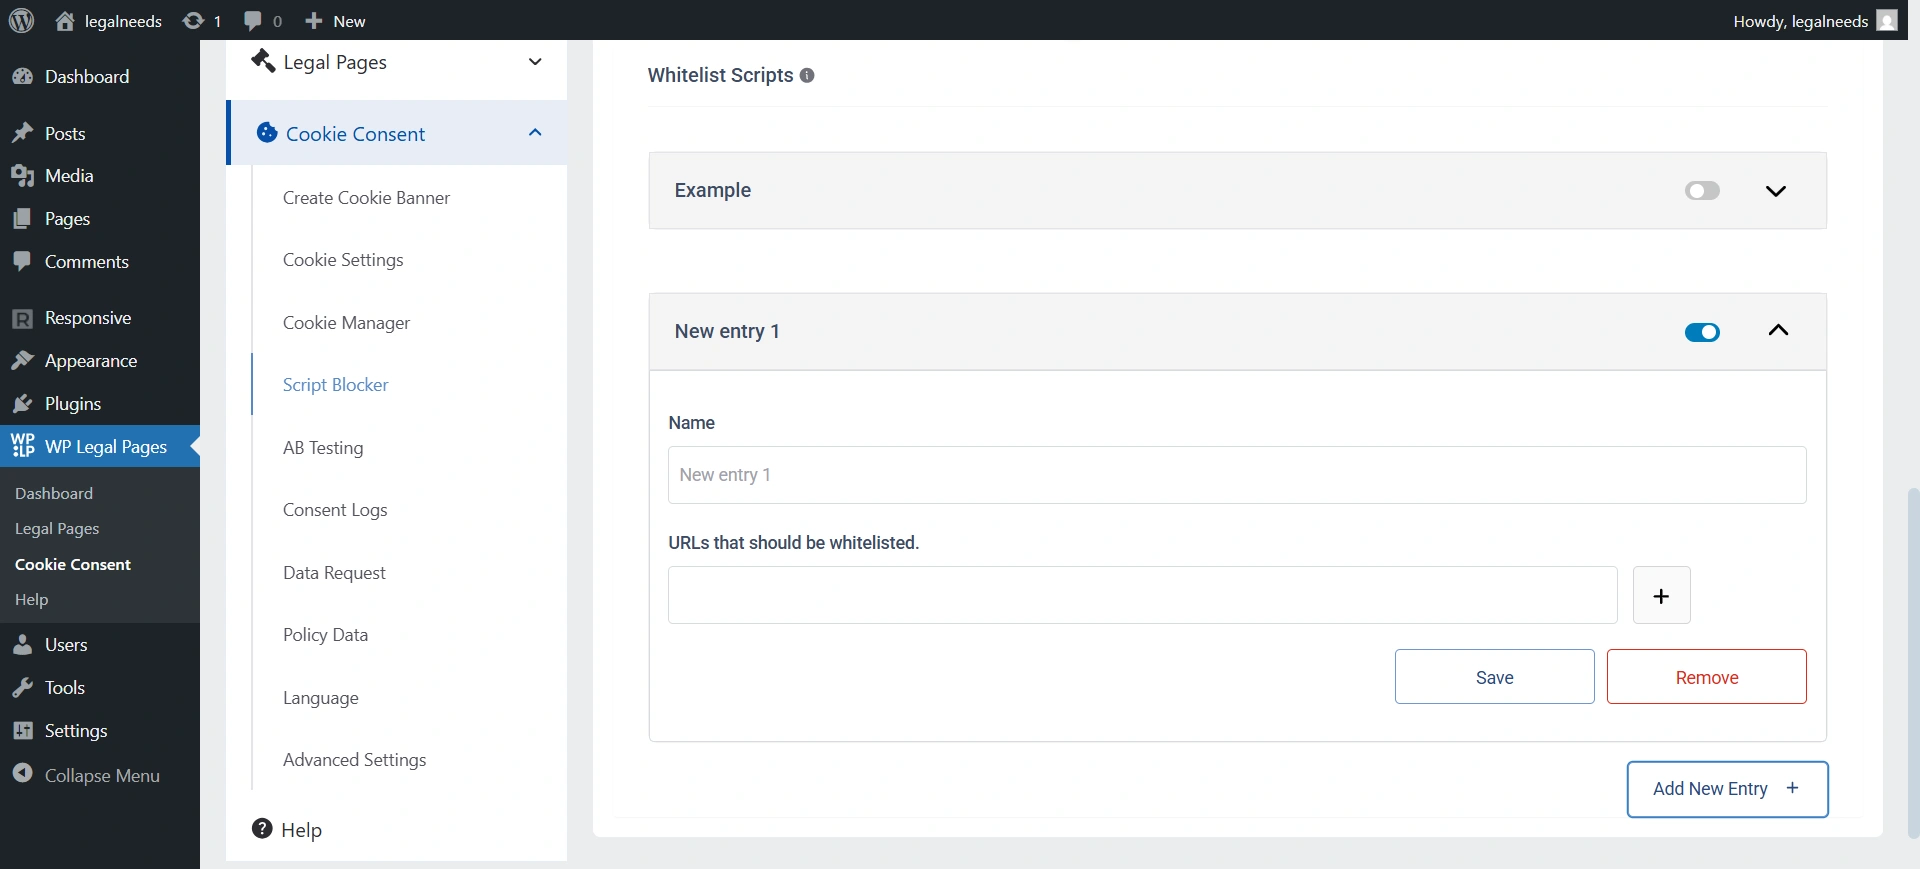
1. Name: Enter a label for the script you are whitelisting (e.g., “Google Fonts”).
2. URLs that should be whitelisted: Add specific script or service URLs you want to allow even without consent (e.g., essential scripts).
3. Save/Remove: Save the whitelist entry or delete it.
4. Add New Entry: Add multiple whitelist entries if you need to allow more scripts.
A/B Testing #
The A/B Testing tab allows you to experiment with different versions of your cookie banner to determine which design or configuration achieves the highest consent rates and best user engagement.
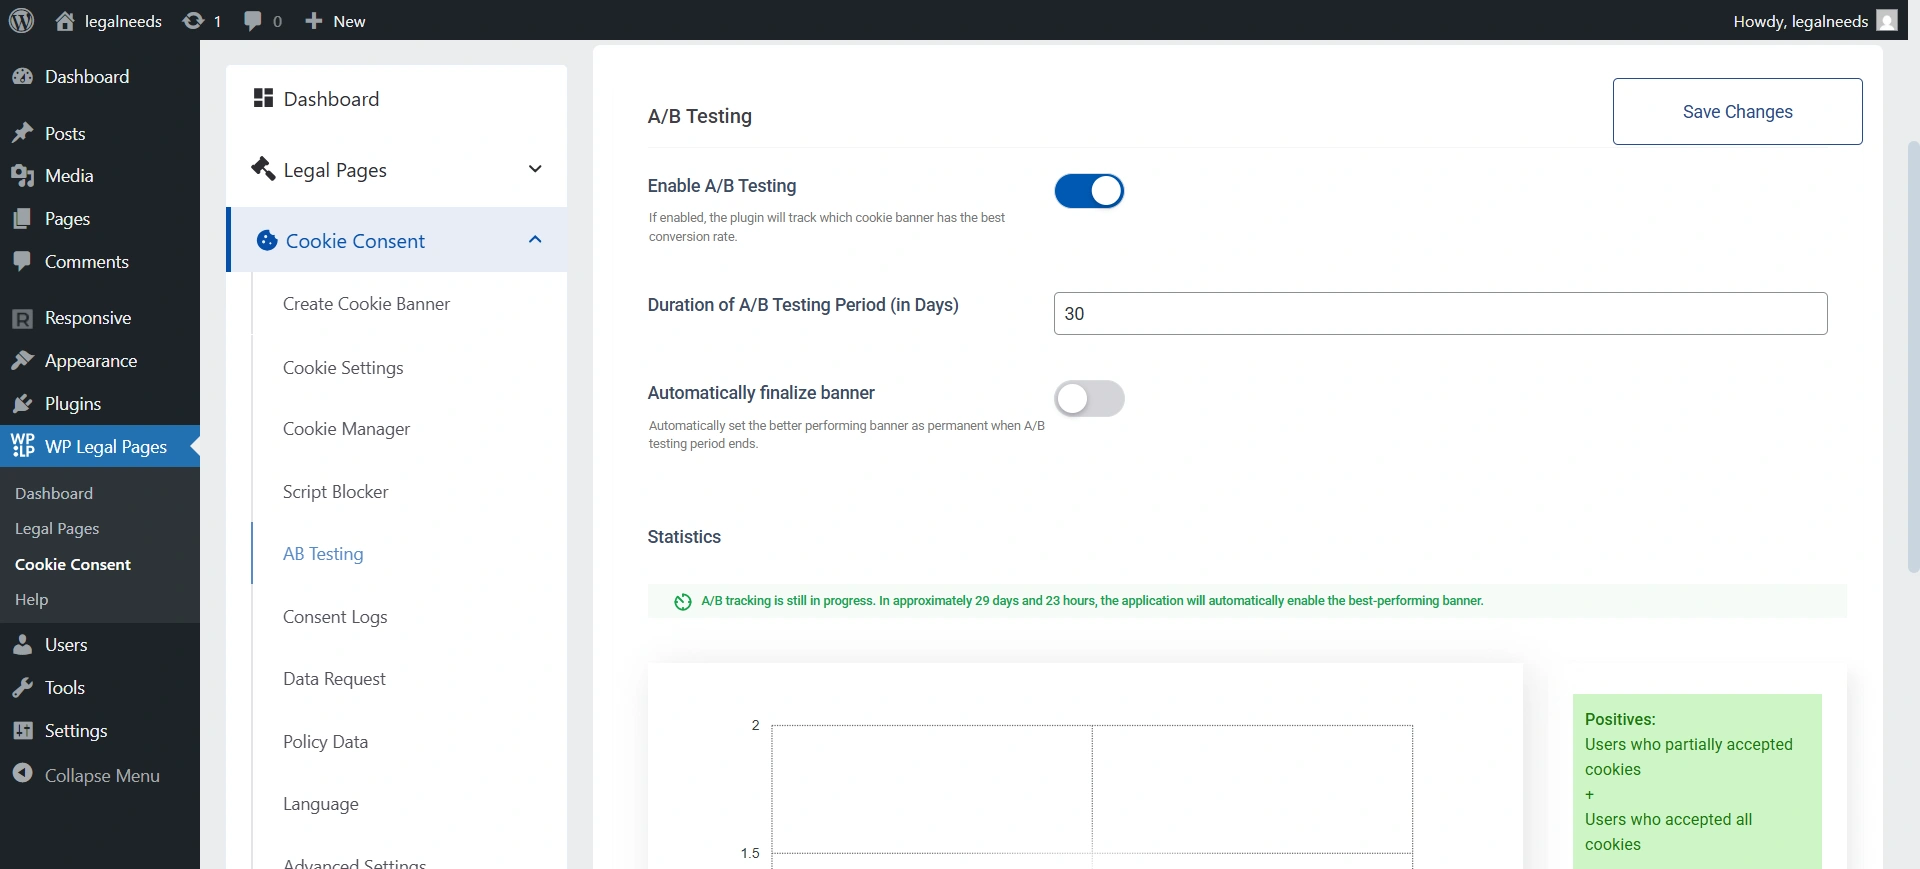
1. Enable A/B Testing: Turns on A/B testing for your cookie banners.
This lets you test two different versions of a banner (Banner A vs Banner B) to see which one gets better user engagement or consent rates.
2. Duration of A/B Testing Period (in Days): Set the number of days you want the test to run. During this time, visitors will randomly see either Banner A or Banner B.
3. Automatically Finalize Banner: The system will automatically select the better-performing banner.
4. Statistics: Once A/B testing is active and running, this area will display comparative performance data between Banner A and Banner B in a chart format.
- View key results such as the number of consents received for each banner and consent type (e.g., Functional, Statistics, Marketing).
- Compare which variation yields higher user engagement and compliance.
Status Notification: During the test, a status bar informs you how much time remains and what will happen once the test concludes.
Learn how to enable A/B testing in your cookie banner.
Language #
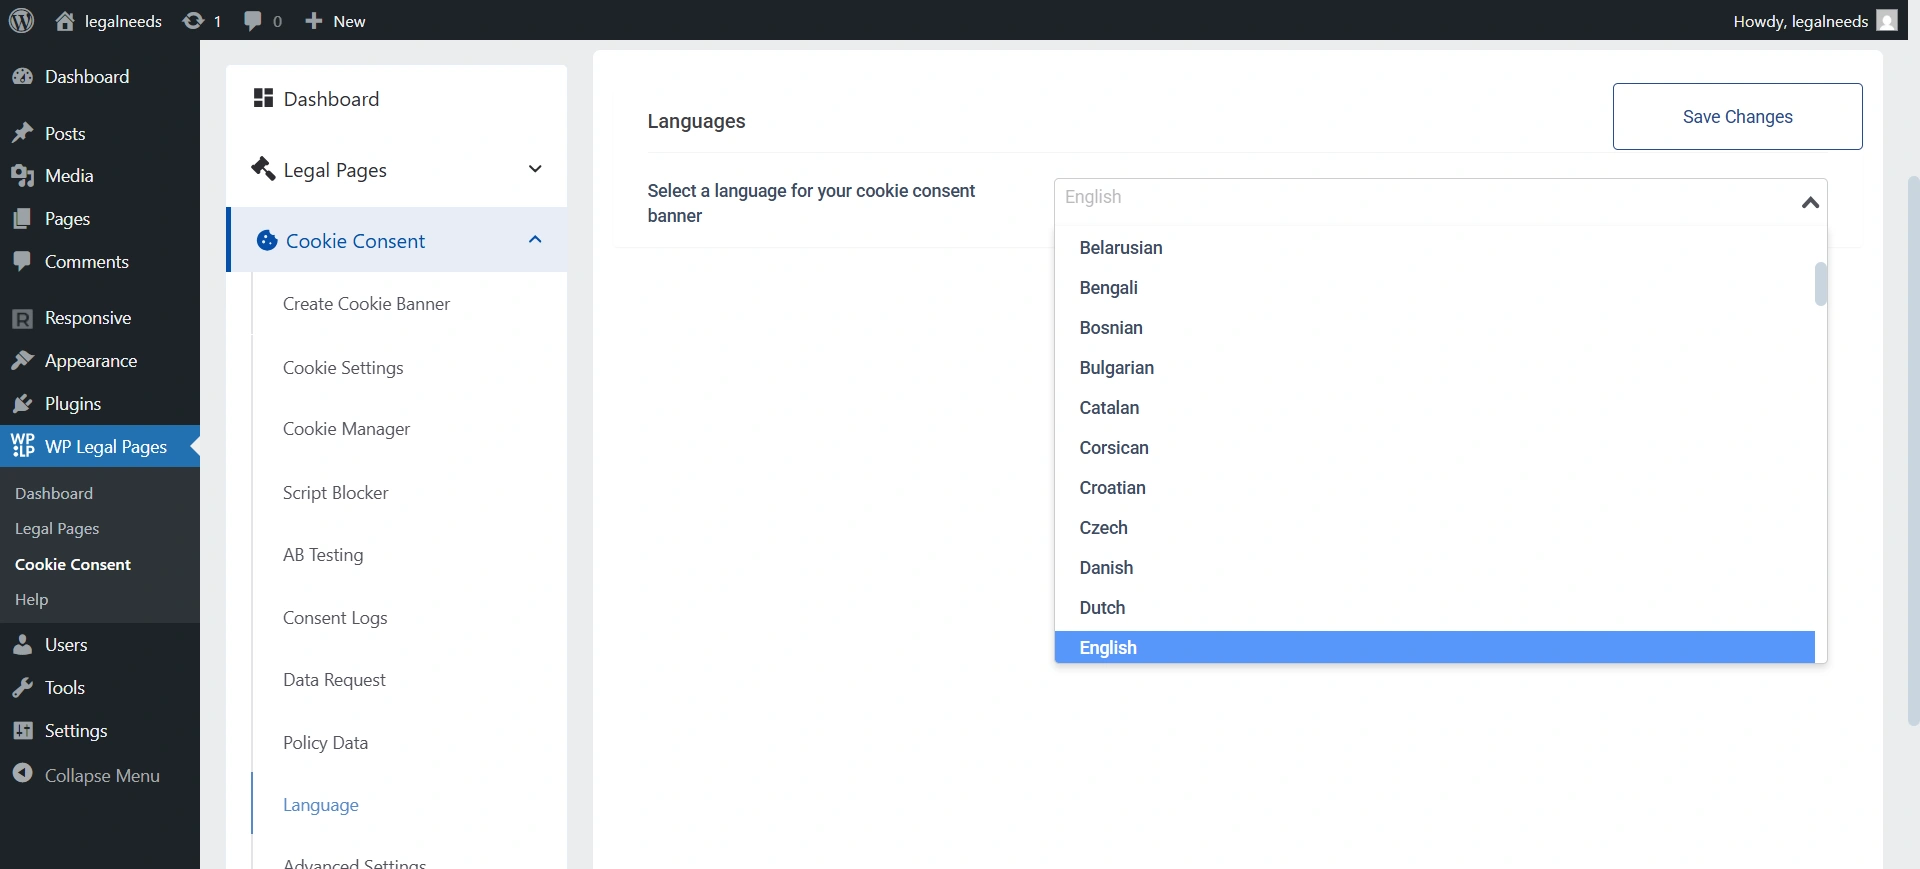
Select the language for your cookie consent banner.
Consent Logs #
The Consent Logs tab provides a centralized view of all user interactions with your cookie banner. This audit trail is critical for compliance with privacy regulations, demonstrating when and how users have provided or declined consent.
From your WordPress dashboard, navigate to Cookie Consent > Consent Logs.
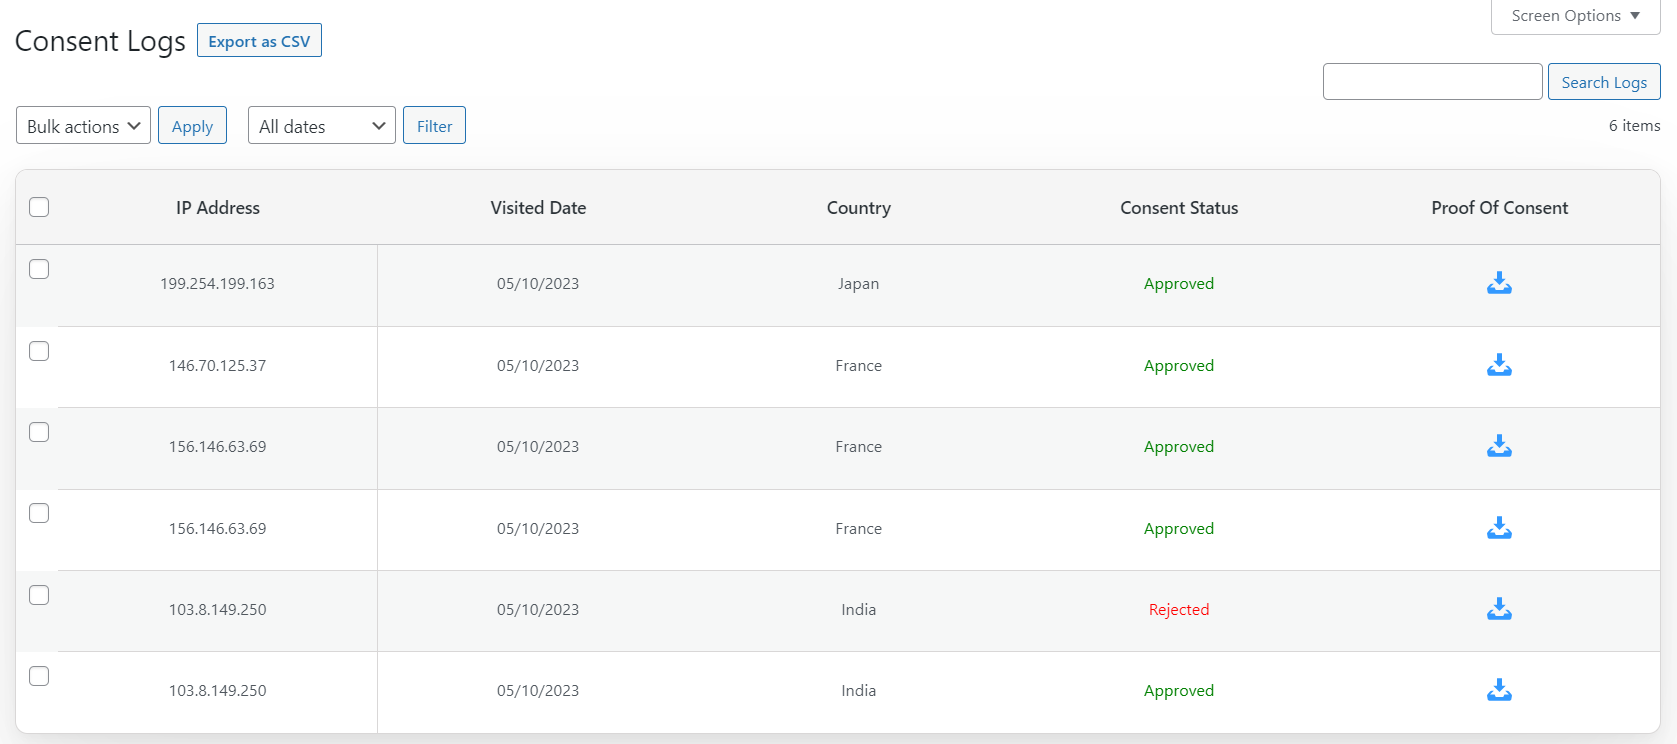
1. Search and Filter
Search Consent Logs: Enter keywords or data in the search bar to quickly find specific consent records.
Bulk Actions: Select multiple log entries to apply actions (such as exporting or deleting) in bulk.
2. Consent Log Table
A summarized list displays details for each recorded consent event:
- IP Address: The IP address from which consent was recorded.
- Visited Date: The exact date when the user accepted or declined the consent notice.
- Country: Geographic location associated with the consent, if available. “Unknown” displays if details cannot be determined.
- Scan Status: Shows whether consent was approved or declined for each visit, using colored labels for clarity.
- Proof of Consent: Download a detailed proof of consent for individual records, useful for documentation or regulatory inquiries.
3. Export Options
Export as CSV: Download all consent logs in CSV format for external analysis, reporting, or data backup.
Data Request #
The Data Request tab enables you to efficiently manage and respond to user data requests, which is a core requirement under data privacy laws like GDPR and CCPA. This central hub lets you track, resolve, and export data requests regarding user information.
From your WordPress dashboard, navigate to Cookie Consent > Data Request.
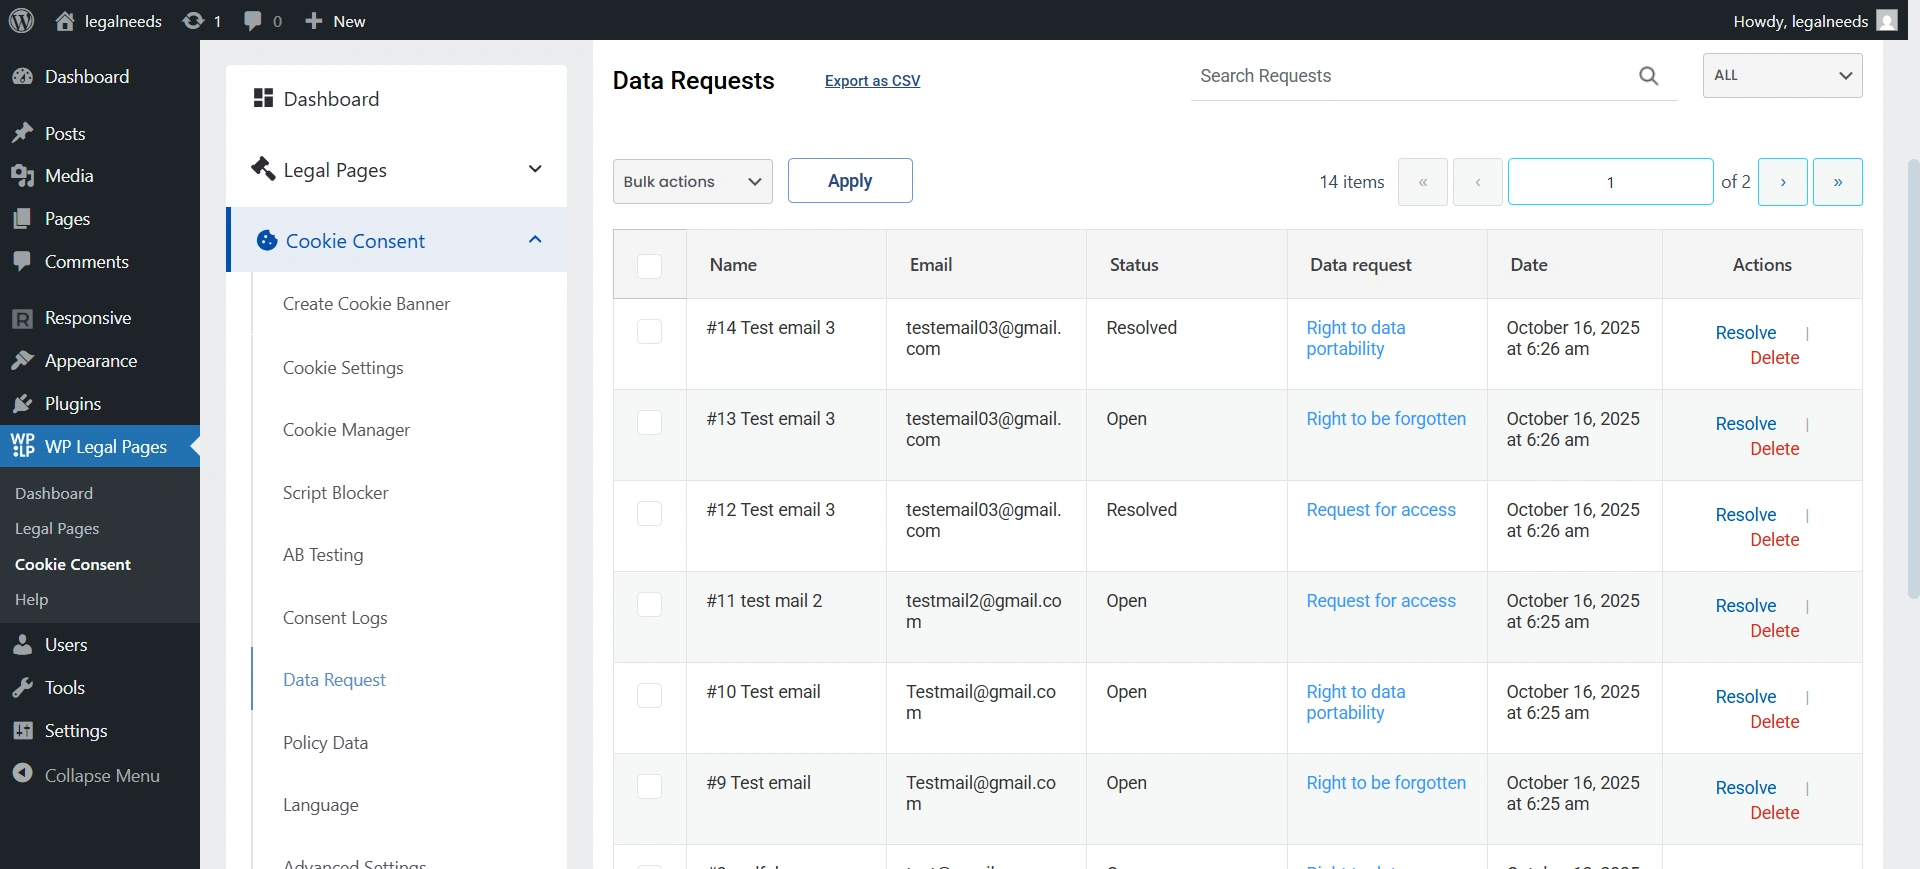
1. Enable Data Request Form
Switch this ON to allow users to submit data access, correction, or deletion requests directly from your website via a public-facing form.
2. Search Data Requests
Use the search bar to filter requests by name, email, or other details for easier management.
3. Data Requests Table
Shows a summary of all incoming user data requests, including:
- Name: Name of the requester.
- Email: Contact email of the requester.
- Status: Shows the progress of each request (Open or Resolved) with colored tags for quick identification.
- Data Request: Indicates the type of request submitted (e.g., Right to Data Portability, Request for Access).
- Date: Timestamp for when the request was submitted.
- Actions: Options include Resolve (to mark a request as handled) or Delete (to remove from the log).
3. Bulk Actions and Export
Bulk Action Selection: Check multiple entries to perform actions simultaneously (such as resolving or deleting several requests at once).
Export as CSV: Download all data requests in CSV format for record-keeping, audits, or regulatory responses.
The Data Request tab helps you maintain transparency, demonstrate compliance, and ensure timely fulfillment of user rights under privacy laws. Enable and monitor this feature to streamline handling of DSARs (Data Subject Access Requests) and related inquiries directly from your compliance dashboard.
Policy Data #
The Policy Data page lets you manage information about third-party policies used on your website.
If your site uses external services (e.g., analytics tools, advertising platforms, or third-party plugins) that have their own privacy/cookie policies, you can list them here. This helps keep your website transparent and compliant with privacy regulations.
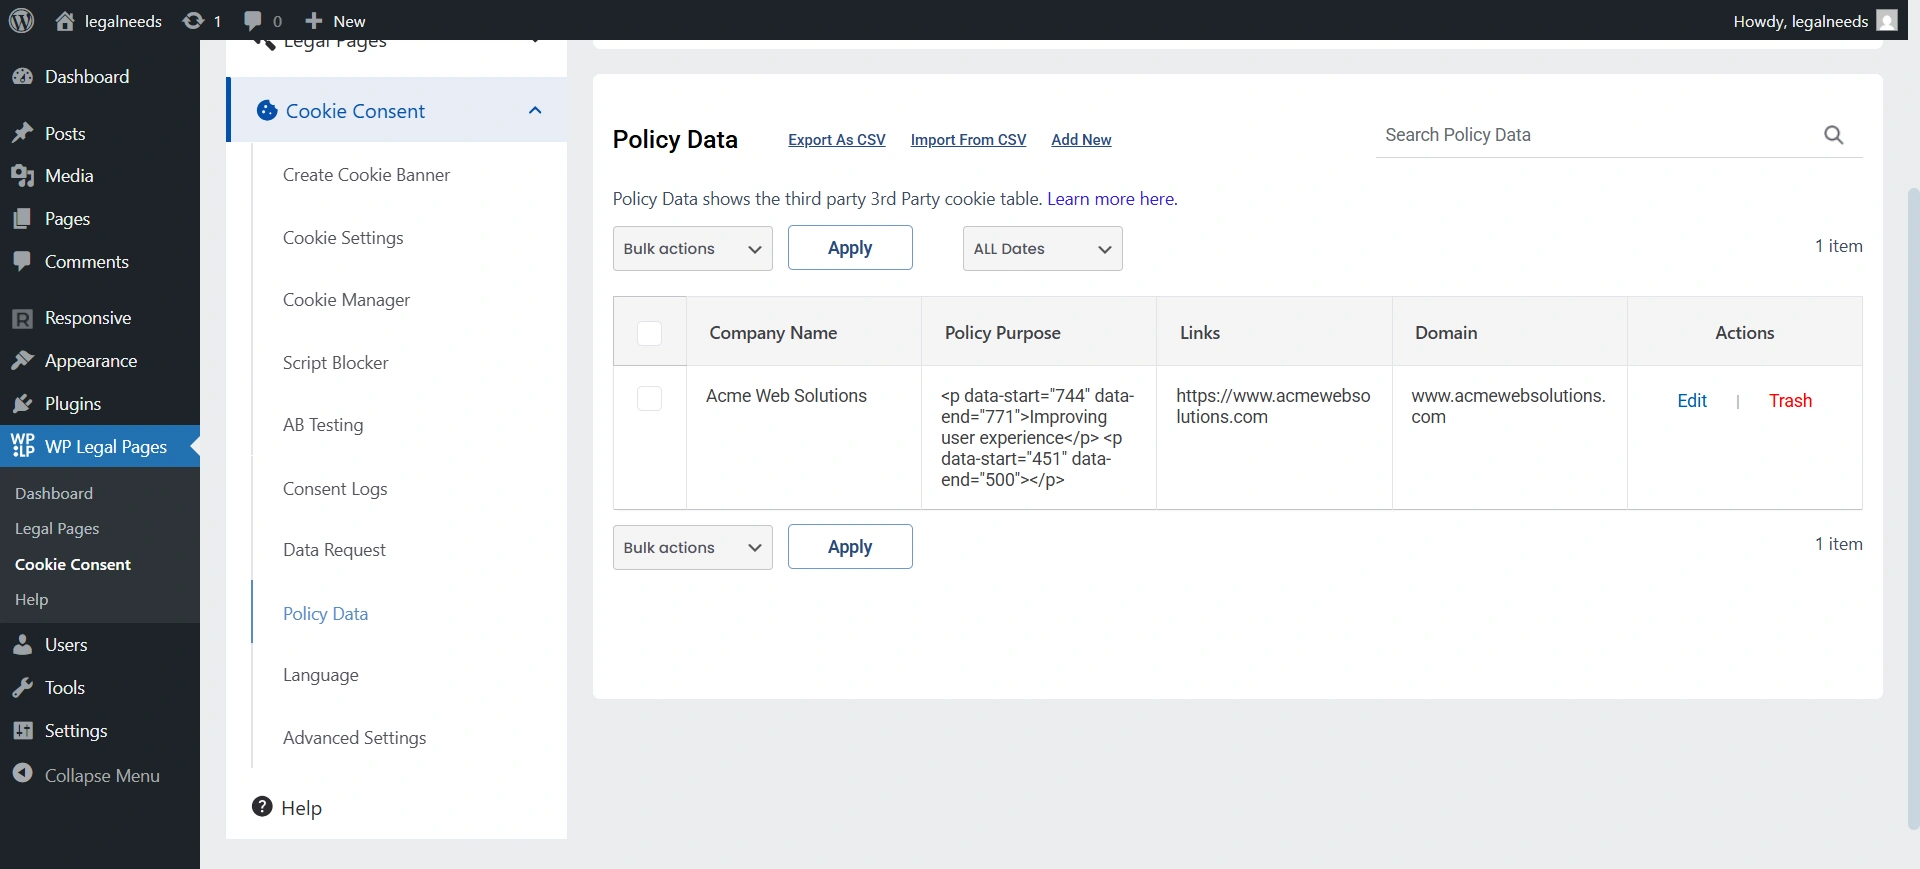
1. Save Changes (top right)
Saves all edits or new entries you’ve made.
2. Add New (right above the table):
Let’s you manually add a new third-party policy.
3. Import from CSV
Upload a CSV file with multiple policy entries at once.
4. Export as CSV
Download all your policy data for backup or external use.
5. Search Requests
A search bar to quickly filter policies by company name, domain, or purpose.
6. Table Columns
- Company Name: The name of the third-party provider (e.g., Google, Facebook).
- Policy Purpose: Why this third-party policy is being used (e.g., analytics, ads, tracking).
- Links: Direct URL to the third-party’s policy page (so users can read it).
- Domain: The domain of the third-party service being used.
- Action (Edit/Delete): Update details of an entry or remove the policy from the list.
Advanced Settings #
The Advanced Settings tab provides granular control over the behavior, logging, privacy, and data management aspects of your cookie consent solution. Use these settings to fine-tune compliance, performance, and user experience.
1. Consent Settings #
Consent Forwarding: Forwards the user’s consent choice to other connected services or plugins. Useful if you have multiple tools relying on the same consent decision.
Enable Consent Logging: Activate detailed event logging for auditing and compliance verifications.
Autolock for Non-Necessary Cookies: Prevent non-essential cookies from being set until explicit user consent is obtained.
Auto Hide (Accept): Automatically hide the banner once the user accepts.
Auto Scroll (Accept): Treats user scrolling as implicit acceptance of cookies.
Risky: Not valid under strict privacy laws like GDPR (explicit consent is required).
Auto Click (Accept): Automatically clicks “Accept” on behalf of the user.
High compliance risk.
Reload After Scroll Accept: Reloads the page after a user gives consent via scroll. Ensures all scripts (cookies/tracking) load properly after consent.
Reload After Accept: Reloads the page once the user clicks “Accept.” Ensures cookies and scripts load immediately.
Reload After Decline: Reloads the page after the user declines cookies. Ensures that blocked cookies/scripts are correctly disabled.
Respect Do Not Track & Global Privacy Control: Respects browser privacy signals like Do Not Track (DNT) and Global Privacy Control (GPC). If enabled, your site automatically honors these signals and avoids setting non-essential cookies when detected.
2. Additional Settings #
Delete Plugin Data on Deactivation: Automatically erase plugin data if the plugin is deactivated for thorough data hygiene.
Show Credits: Toggle display of plugin or vendor credits on the banner.
Cookie Expiry: Set the lifetime/expiry period for stored cookies (e.g., 1 Year).
Enable Safe Mode for Cookies: The Safe Mode option exists to make sure your site doesn’t break due to script blocking or complex geo-targeting rules. Some themes, plugins, or setups may conflict with WPLP advanced features, like.
- Script Blocker: Which stops non-essential scripts until consent is given.
- Banner Geo-Targeting: This shows banners only in selected countries.
In certain environments, these features can cause issues (e.g., scripts not loading properly, visitors not seeing banners, or page rendering errors).
How Safe Mode Works #
When you enable Safe Mode:
- The script blocker is disabled, so all scripts load normally without waiting for consent.
- Country selection in geo-targeting is disabled, so the banner is shown globally instead of being restricted by region.
This ensures maximum compatibility and guarantees that your site continues working smoothly, even if advanced compliance features can’t be applied safely.
Share Usage Data: Allow us to collect anonymous data about how you use the plugin. This helps us identify issues, improve features, and enhance user experience. No personal or sensitive information is collected.
Export Personal Data: Click “Export” to download a copy of all personal and consent data maintained by the plugin.
Erase Personal Data: Redirects you to WordPress’s built-in Erase Personal Data tool, where you can delete a user’s personal data upon request.
Reset Settings: Instantly revert all plugin settings or personal data to original default values.
3. Cookie Settings Export/Import
Export Settings: Download your current cookie consent configuration as a backup or for migration.
Import Settings: Upload a previous configuration file to restore or replicate settings instantly (choose your file and click Import).
Reset Settings: Restore export/import settings to their defaults with a single click.
These advanced features empower you to fully align your site’s cookie consent workflow with regulatory, operational, and technical needs. Regularly review and update these settings for robust, up-to-date compliance and data management.


