
Good news! The WPLP Compliance Platform now works with Google’s Consent Mode. That means you can connect your cookie banner directly with how Google handles tracking, based on your users’ choices. With our latest update, if you’re running Google Ads, you can now plug everything in smoothly using Consent Mode v2.
It’s super handy for staying compliant while still keeping your marketing on track. We’ve also put together a quick guide to help you get it set up on your site.
What is Google Consent Mode v2? #
Consent Mode allows you to convey your users’ cookie or app identifier preferences to Google. In response, tags automatically adjust their behavior to respect these choices.
By integrating Consent Mode with your cookie banner or widget, you ensure that Analytics, Ads, and third-party tags dynamically adapt their functionality based on user consent.
Google Consent Mode v2 #
Google Consent Mode v2 is basically an upgraded way for websites and advertisers to handle user consent for things like tracking and cookies, especially with privacy rules like GDPR in place.
It brings in standardized banners and easier-to-use controls, so it’s simpler for visitors to say “yes” or “no” to cookies. And if you’re running ads with Google, this version helps tie that user consent directly into your campaigns.
What’s new in Consent Mode v2 #
Google rolled out Consent Mode v2 to keep up with evolving privacy rules and give users more clarity and control over their data. The update adds two new settings: ad_user_data and ad_personalization that help fine-tune how personal info is handled for ads.
Now, the user’s consent is managed via 7 parameters-
| ad_storage | Enables storage (such as cookies) related to advertising. |
| ad_user_data | Sets consent for sending user data related to advertising to Google. The ad_user_data consent type is required for measurement use cases, such as enhanced conversions and tag-based conversion tracking. |
| ad_personalization | Sets consent for personalized advertising. |
| analytics_storage | Enables storage (such as cookies) related to analytics e.g. visit duration. |
| functionality_storage | Enables storage that supports the functionality of the website or app e.g. language settings. |
| personalization_storage | Enables storage related to personalization e.g. video recommendations |
| security_storage | Enables storage related to security such as authentication functionality, fraud prevention, and other user protection. |
Read more about how these 7 parameters affect google tags behaviour at Consent Mode Reference
Basic vs Advanced Google Consent Mode v2 #
Google Consent Mode v2 has also introduced two distinct implementation types: Basic and Advanced.
In general, there could be three possibilities regarding Google Consent Mode:
- No Consent Mode: Consent Mode is not implemented on the website at all. No user data is collected at all, which means that website owners or advertisers can only provide non-personalized ads on Google platforms.
- Basic Consent Mode: Consent Mode has been implemented, but data is collected only from consented users when they grant user consent.
- Advanced Consent Mode: Consent Mode has been implemented, and data is collected from both consented and non-consented users, when they grant consent and when they deny consent.
What Is the Basic Consent Mode? #
Basic Consent Mode is designed for website owners who prefer an easier setup process. It requires less customization of Google Tags functionality.
It ensures that no Google Tags are fired unless a user explicitly grants consent, making it ideal for websites that need to adhere to GDPR, ePrivacy Directive, and other privacy regulations.
Benefits of Basic Consent Mode
Key features of the Basic mode include:
- Easier setup process: Basic Consent Mode requires less customization of the functionality of Google Tags.
- Simplified consent management: With a single consent message, users can easily make informed decisions about their data privacy preferences.
- Reduced functionality for unconsented users: Users who reject cookies will still have access to essential website functionalities, while non-essential tracking is disabled.
- Compliance with privacy regulations: Basic mode helps website owners comply with regulations such as the GDPR and the ePrivacy Directive by providing a mechanism for obtaining user consent for cookies and other tracking technologies.
What is Advanced Consent Mode? #
Advanced Consent Mode is a bit more complex and offers more customization options for the functionality of Google Tags. It lets website owners define specific behaviors for tags and cookies based on user consent states. In this mode, website owners can implement multiple consent messages tailored to different types of cookies and tracking technologies.
While Advanced Consent Mode is an optional feature, it allows granular control over tag and cookie behaviours based on different consent states. This flexibility helps meet specific regulatory requirements and user preferences.
Benefits of Advanced Consent Mode
Key features of Advanced mode include:
- Customizable consent notices: Website owners can create multiple consent notices to prompt users to consent to different types of cookies and other tracking technologies.
- Flexible data collection: Website owners can load Google Analytics in different configurations based on user consent preferences, including full functionality, reduced functionality, or no functionality.
- Better modeling: Advanced Consent Mode enables conversion modeling in Google Analytics and Google Ads, and behavioral modeling in Google Analytics.
- Enhanced user experience: By offering users more control over their data privacy preferences, Advanced Consent Mode can help improve the overall user experience and build trust with website users.
- Full compliance with privacy regulations: Advanced Consent Mode allows website owners to comply with strict privacy regulations by offering granular control over consent management and data collection practices.
You can read more about both of these at the official Google documentation.
How to enable Google Consent Mode on your website using WPLP Compliance Platform? #
There are two ways to implement Google Consent Mode using WPLP Compliance Platform:
- Using Google Tag Manager Template
- Using WP Cookie Consent Plugin admin panel
Method 1: Using Google Tag Manager Template #
First, you need to set up Google Tag Manager for your website. You can refer to the help guide for detailed instructions. This implementation uses WPLP Compliance Platform via the WPLP Compliance Platform CMP Template Gallery Tag inside GTM.
Note #
Follow the below steps to successfully integrate GCM using Google Tag Manager template-
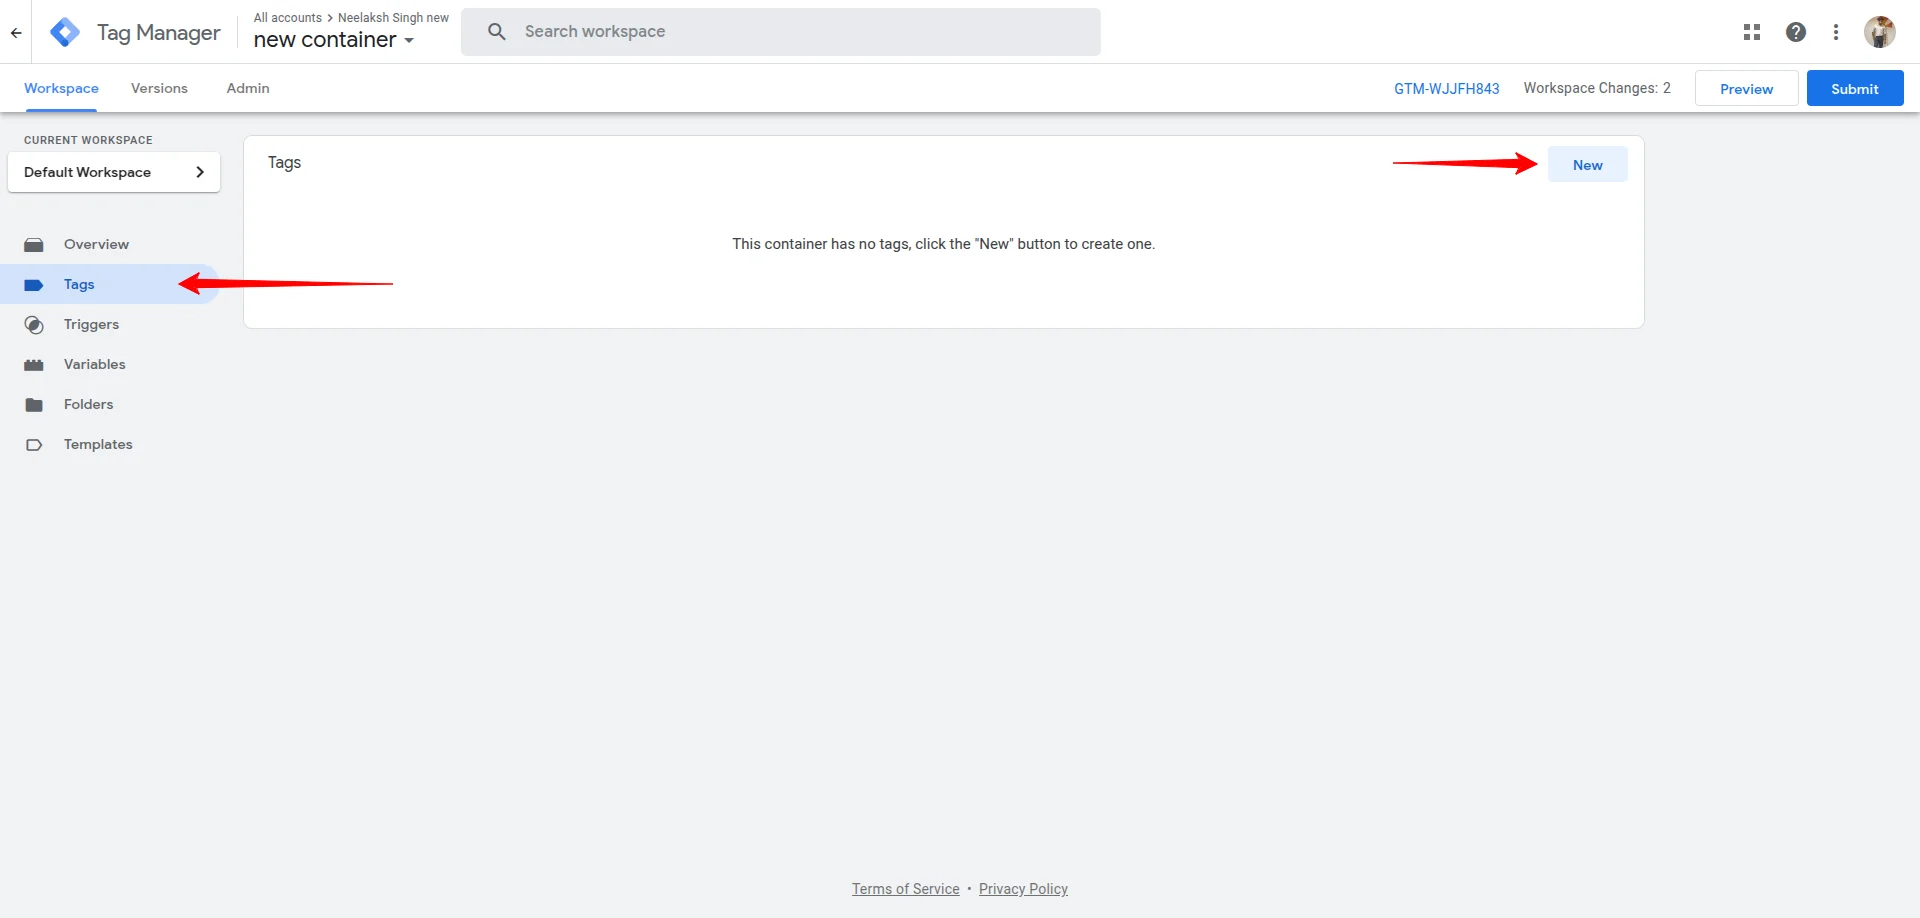
Step 1. First, you’ll need to create a new tag. Click Tags in the left sidebar, and then New as shown below.
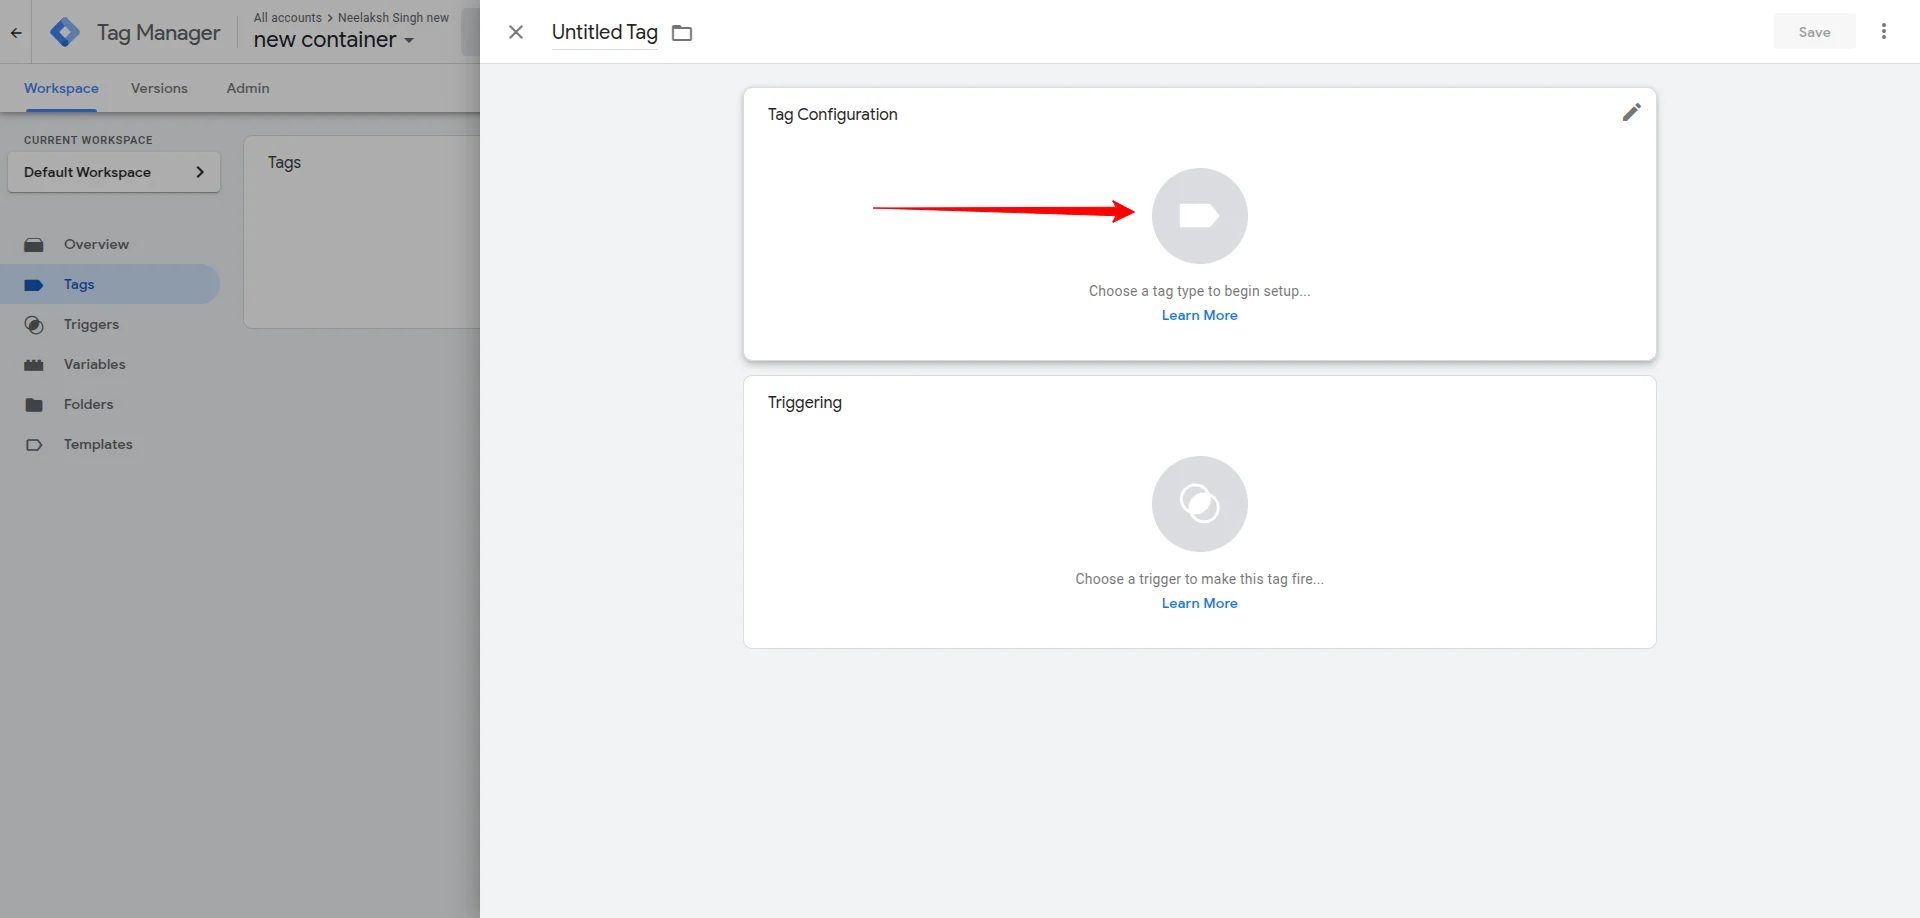
Step 2. Click on Tag Configuration > Discover more tag types in the Community Template Gallery and search for WPLP Compliance Platform.
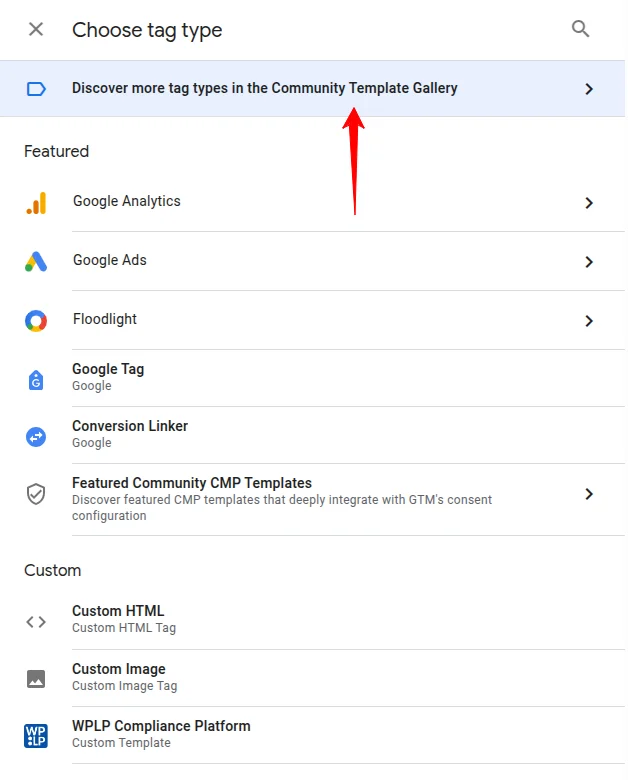
Step 3. Choose the WPLP Compliance Platform template and click Add to workspace > Add to add the tag.

Step 4. You will see the tag configuration panel. To add Default Consent Setting:
- Click Add Row.
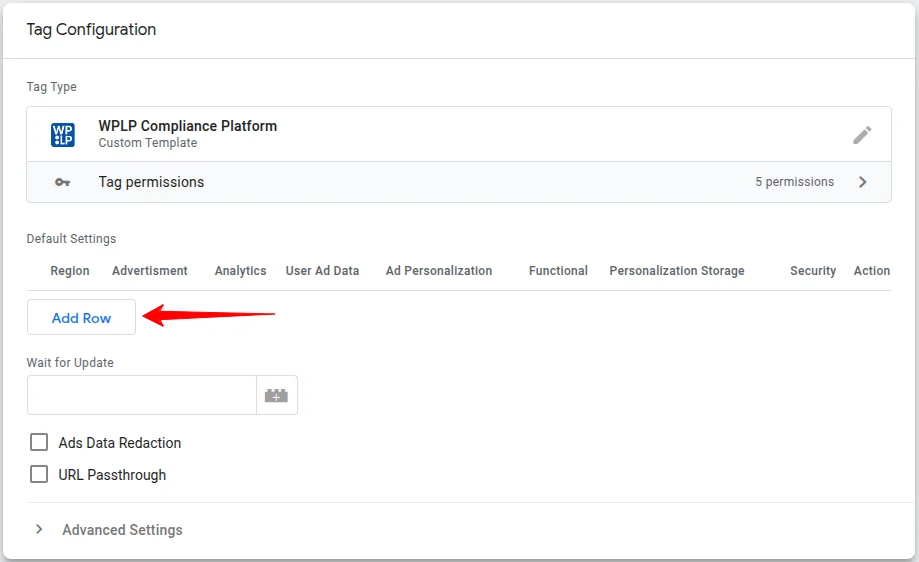
2. Select Granted/Denied from the drop down for each cookie category based on your requirements.
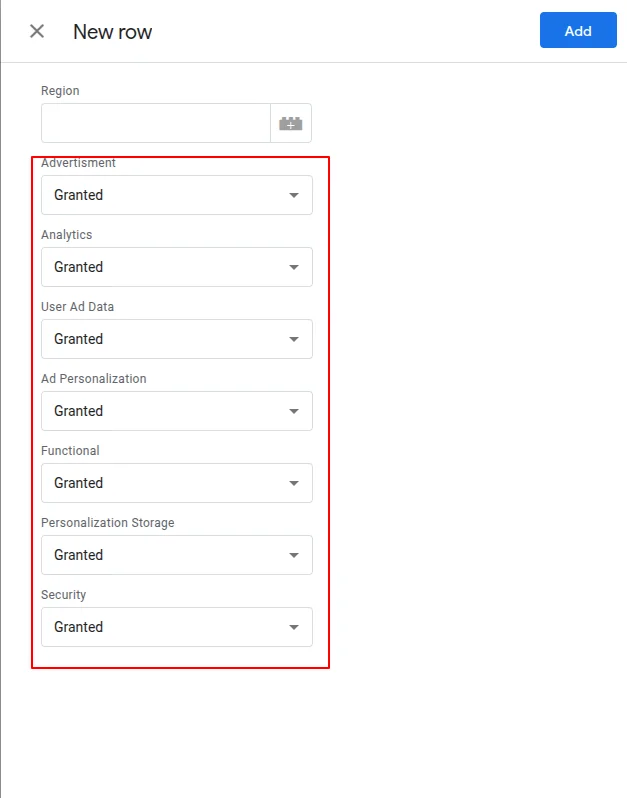
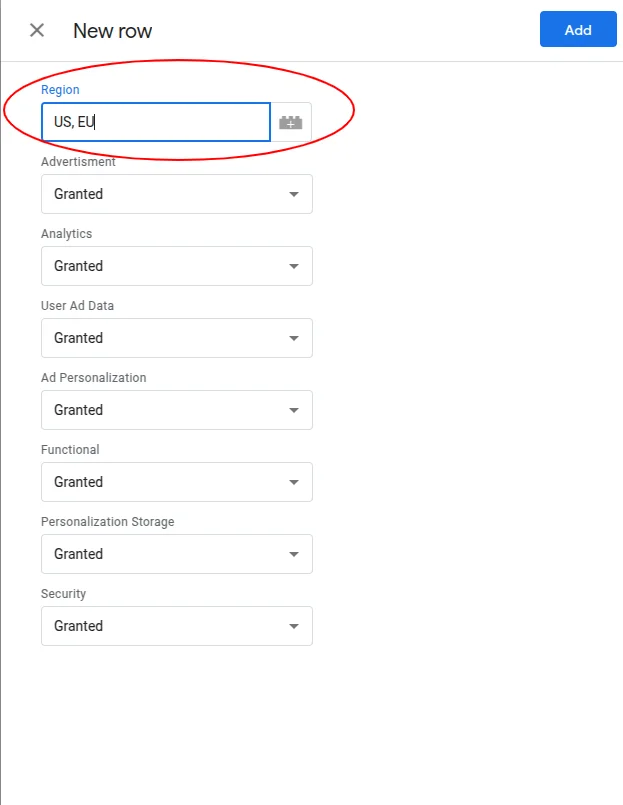
3. Set the Region by entering the region’s ISO-standardised (ISO 3166-2) codes(comma separated) for the specific regions you intend to Geo-target with your banner. If you prefer not to Geo-target your default consent state to specific regions around the globe, leave the region empty. Refer to the ISO 3166-2 standard for the appropriate region codes.
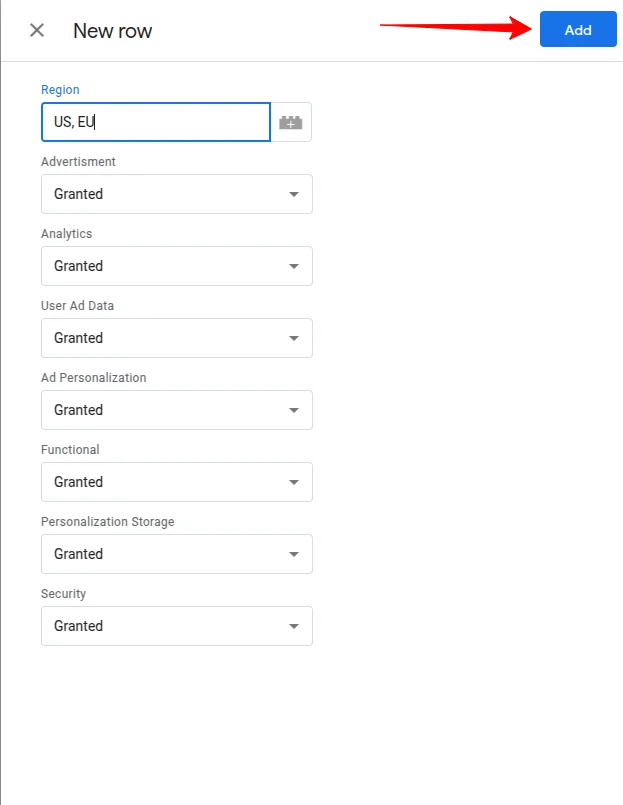
4. Click Add.
Note #
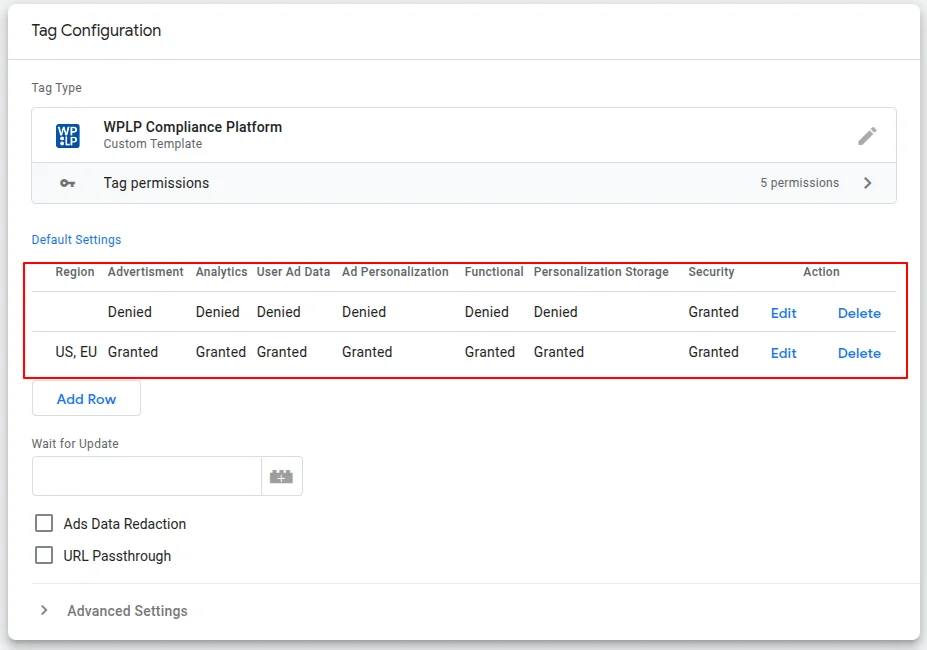
Step 5. You can set the wait for update parameter to your desired value. It is the time in milliseconds you want to wait before the data is sent to Google Tag Manager.
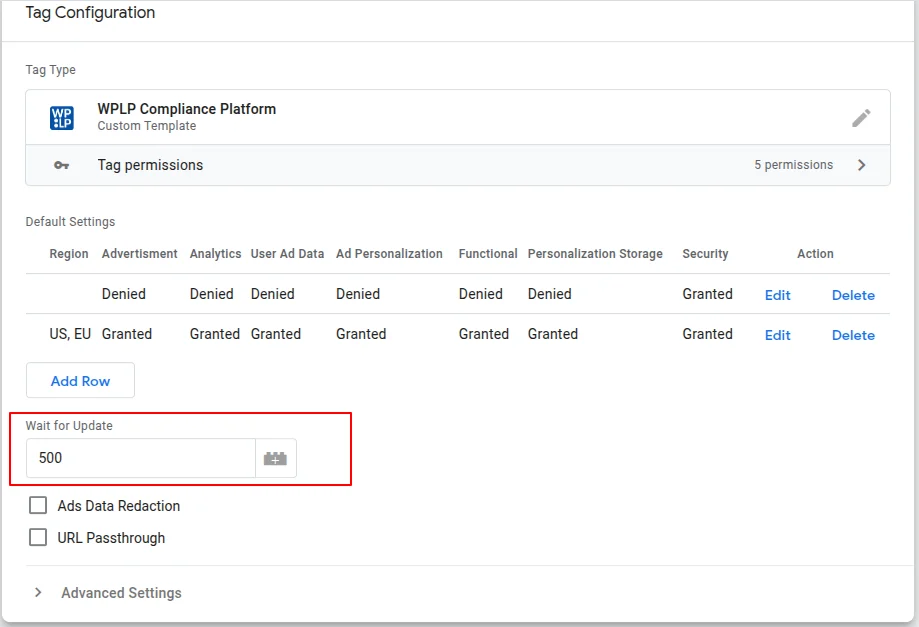
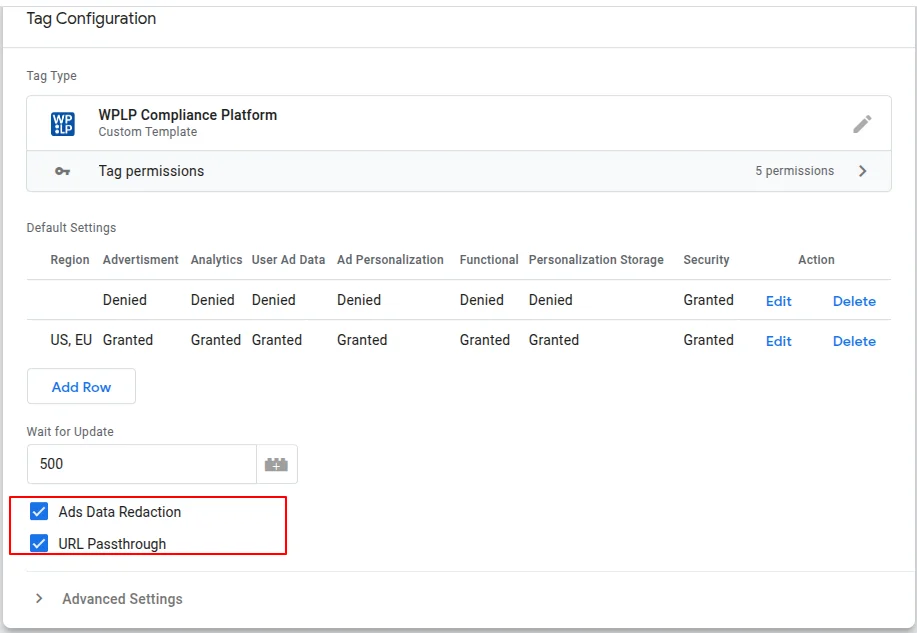
Step 6. You can also set parameters ads data redaction and URL Passthrough to true as per your needs.
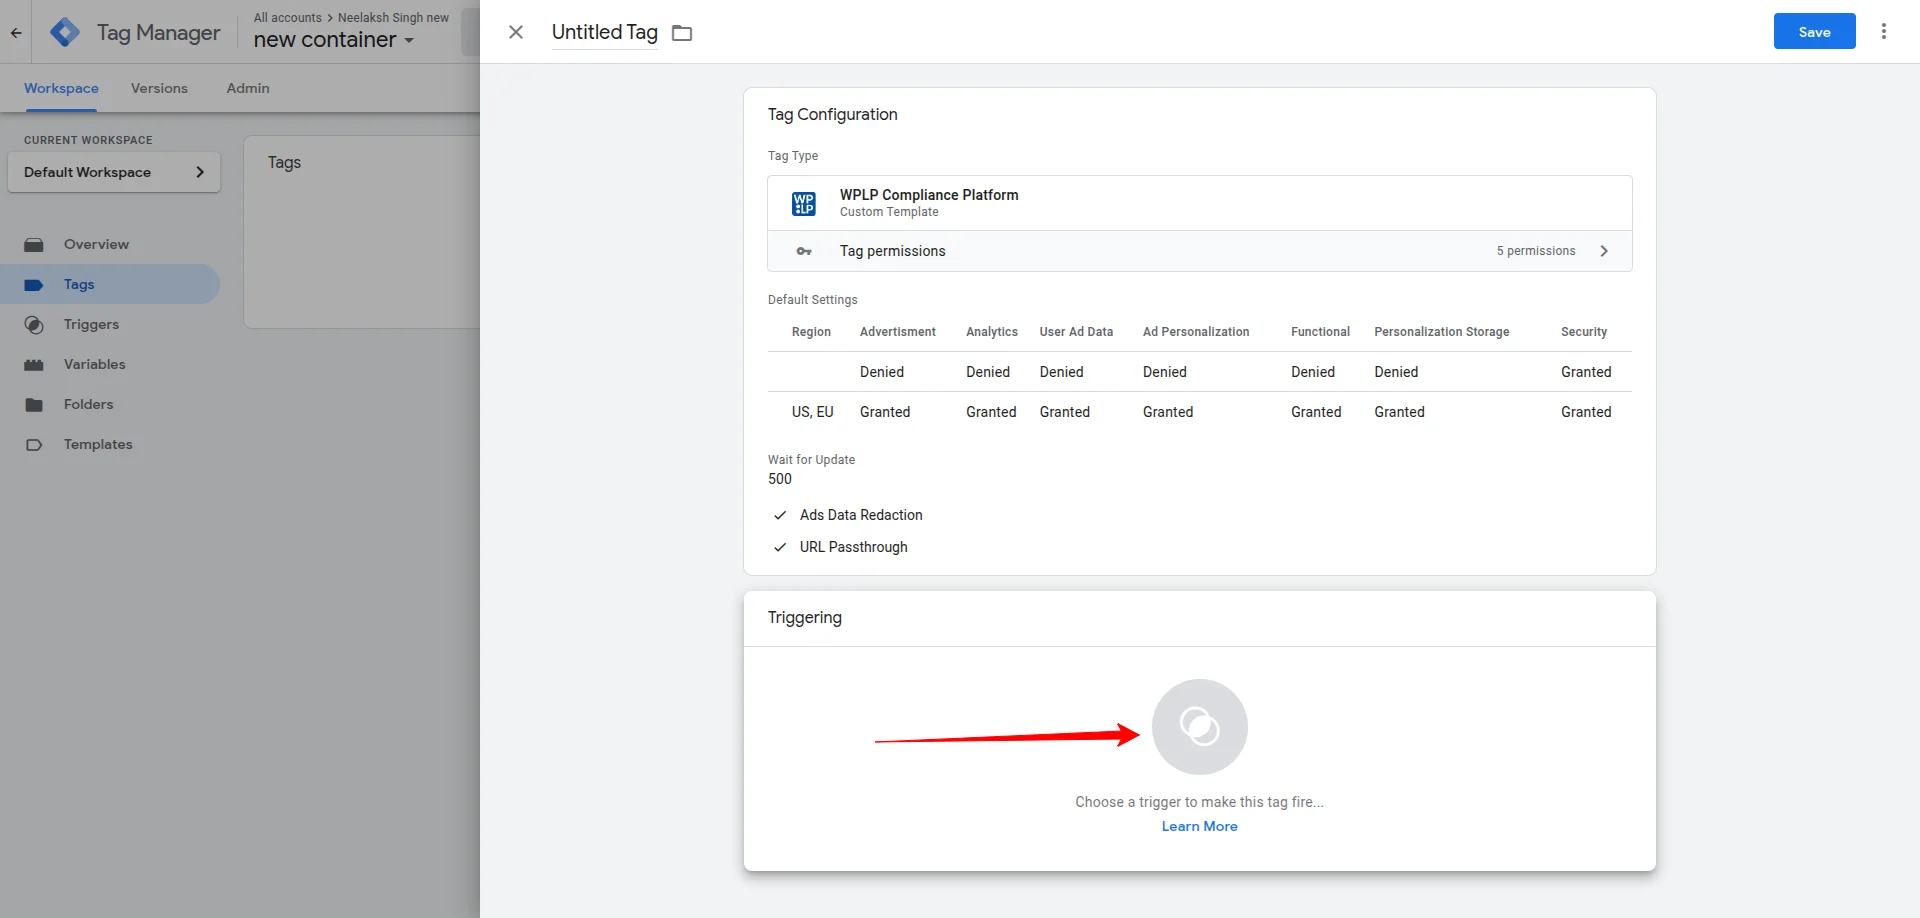
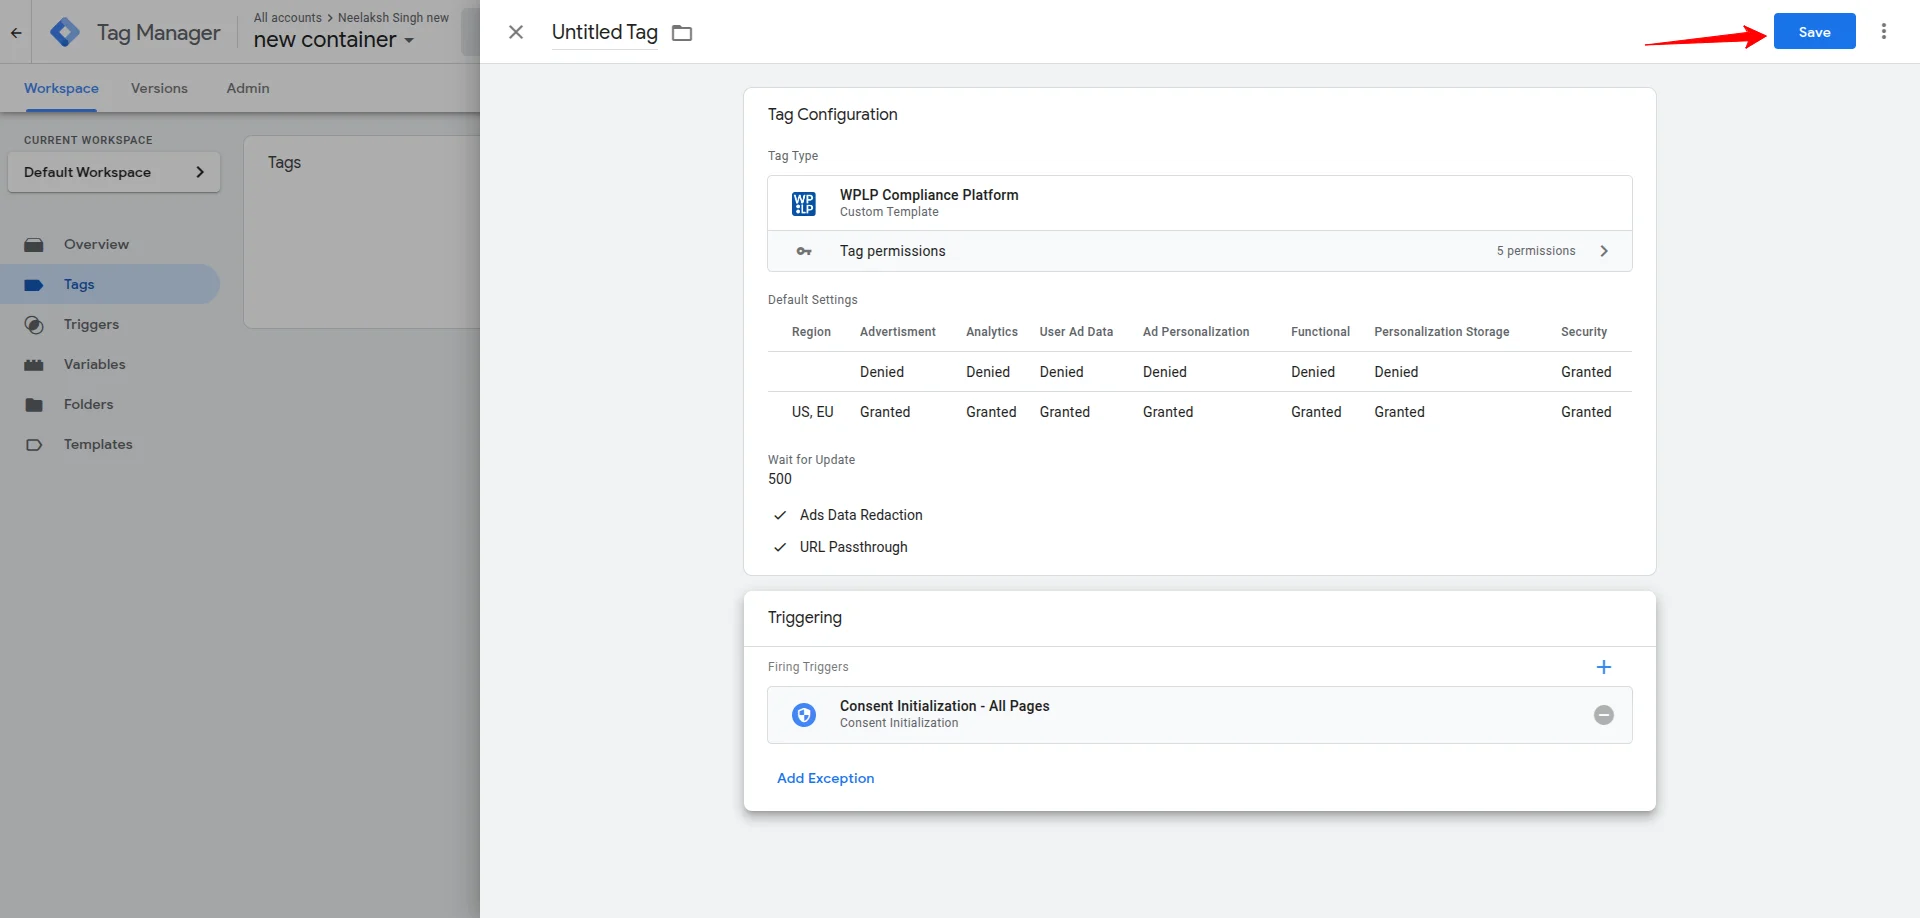
Step 7. Scroll down to the Triggering tab and select Consent Initialization – All Pages as the trigger for your tag.

Step 8. Click Save to complete the integration of Google Consent Mode with your GTM container.
Step 9. Now make sure you have installed and activated the WP Cookie Consent Plugin on your website, and enabled Enable Cookie Notice toggle and disabled Support Google Consent Mode(GCM) toggle( this toggle is enabled in method 2)

Method 2: Using WP Cookie Consent Plugin Interface #
Follow the steps below carefully to implement Google Consent Mode.
Note #
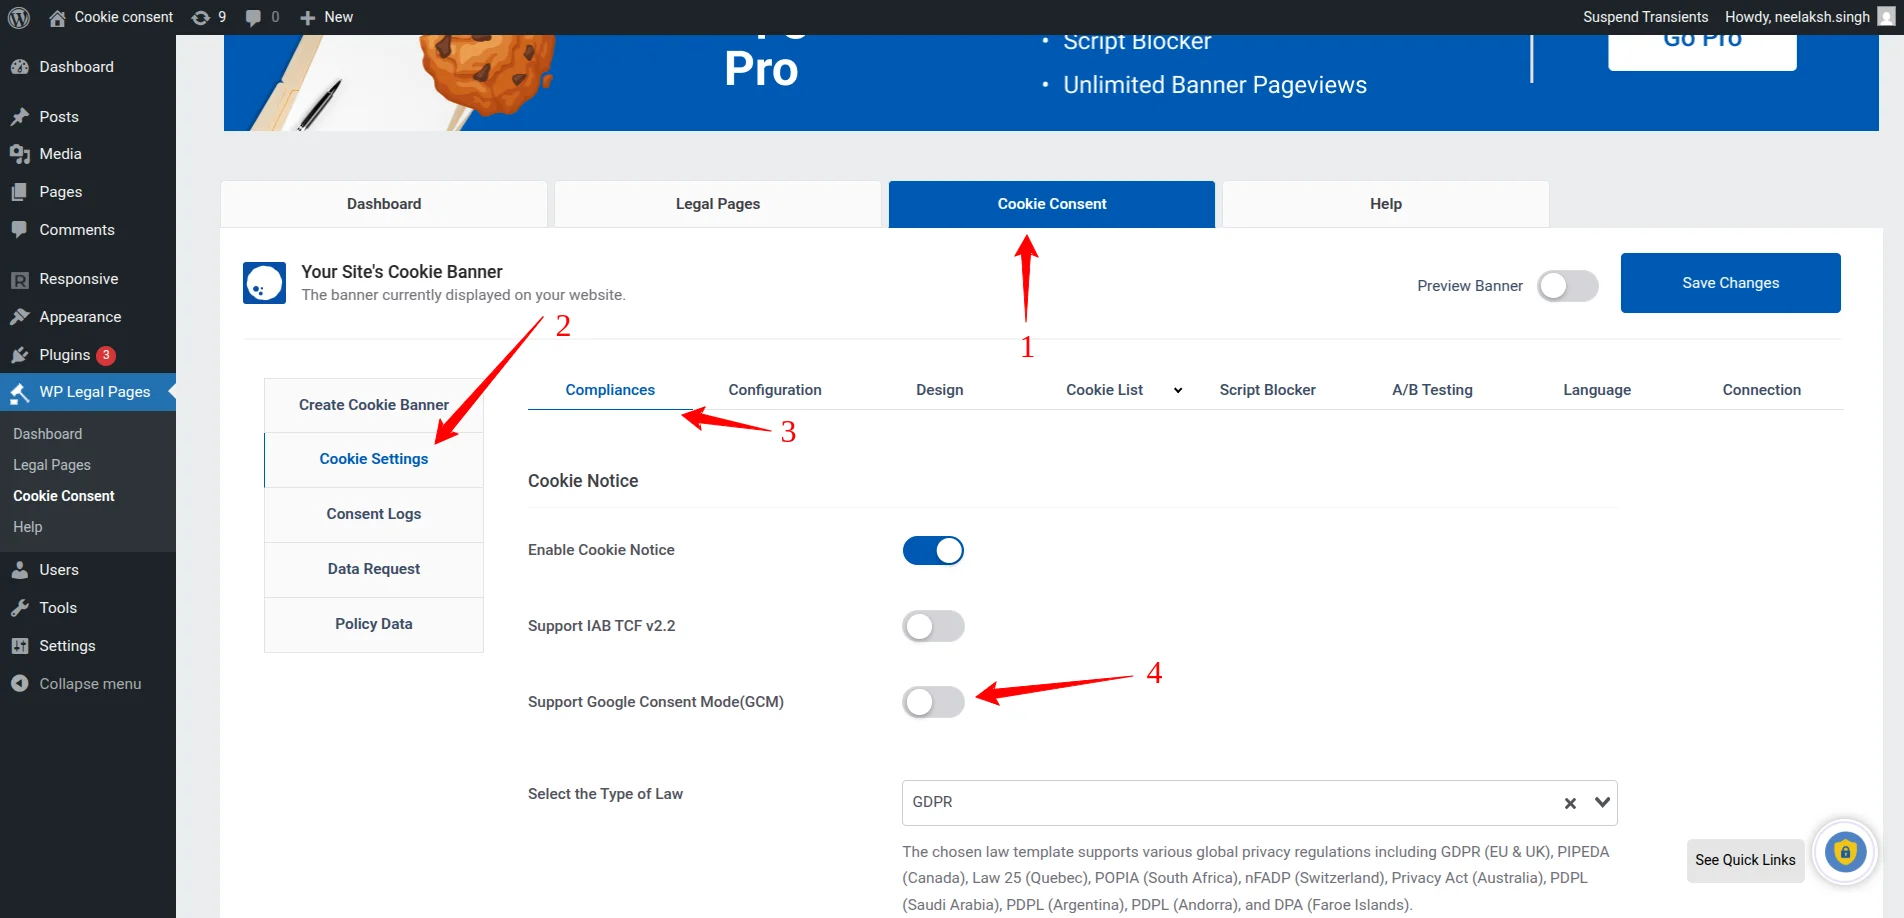
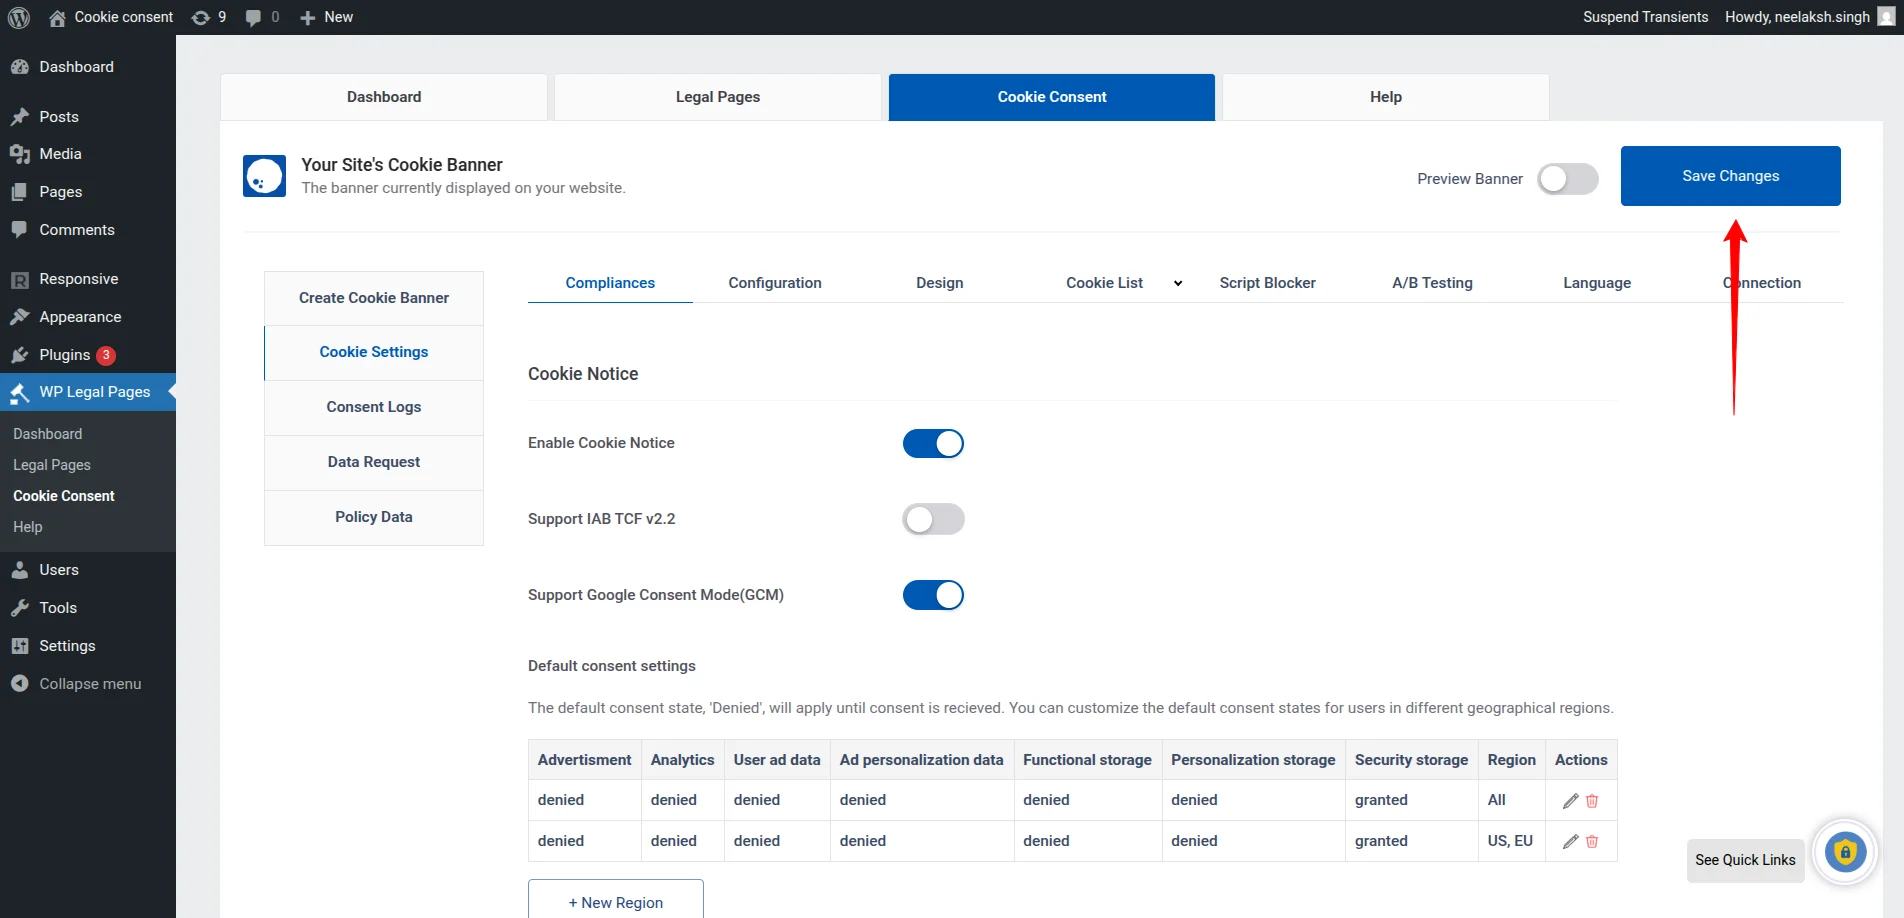
Step 1. Navigate to Cookie Consent > Cookie Settings > Compliances and enable Support Google Consent Mode(GCM) toggle.
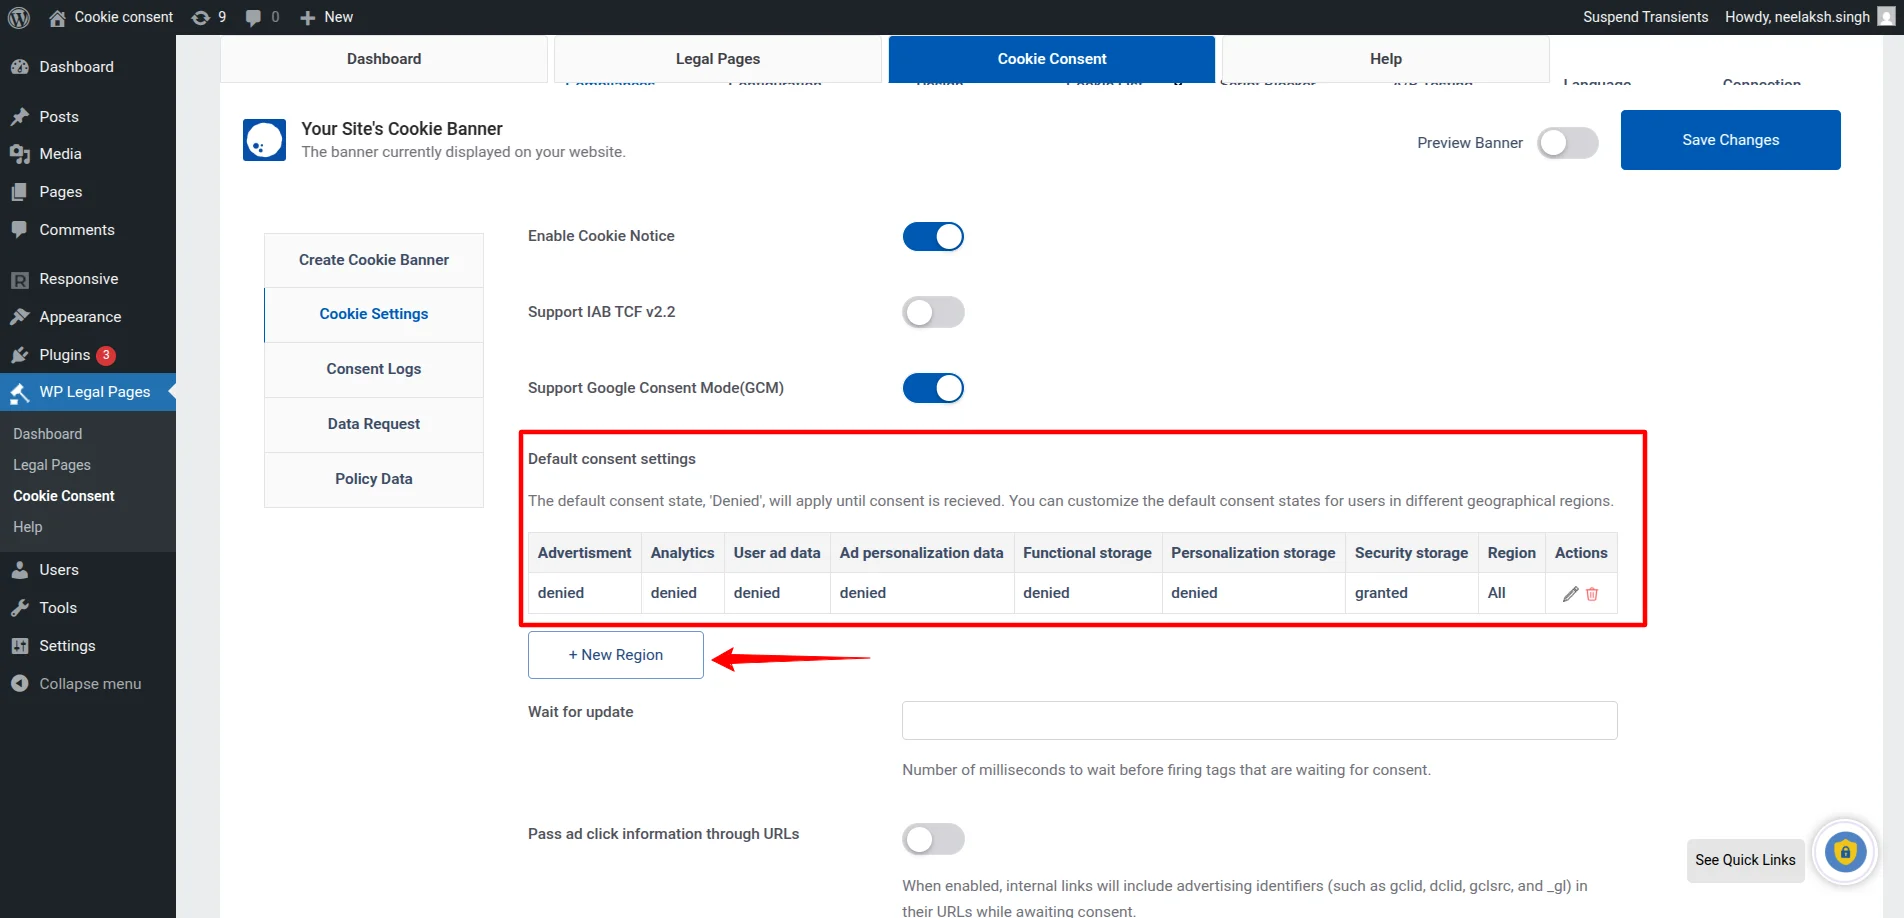
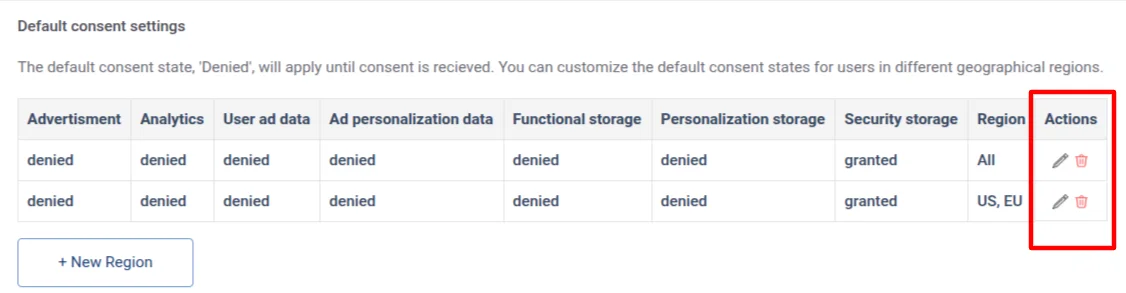
Step 2. You will see Default Consent Settings. By default it has a single row with default settings of Denied being applied to all regions. Click on +New Region button to add a new row.
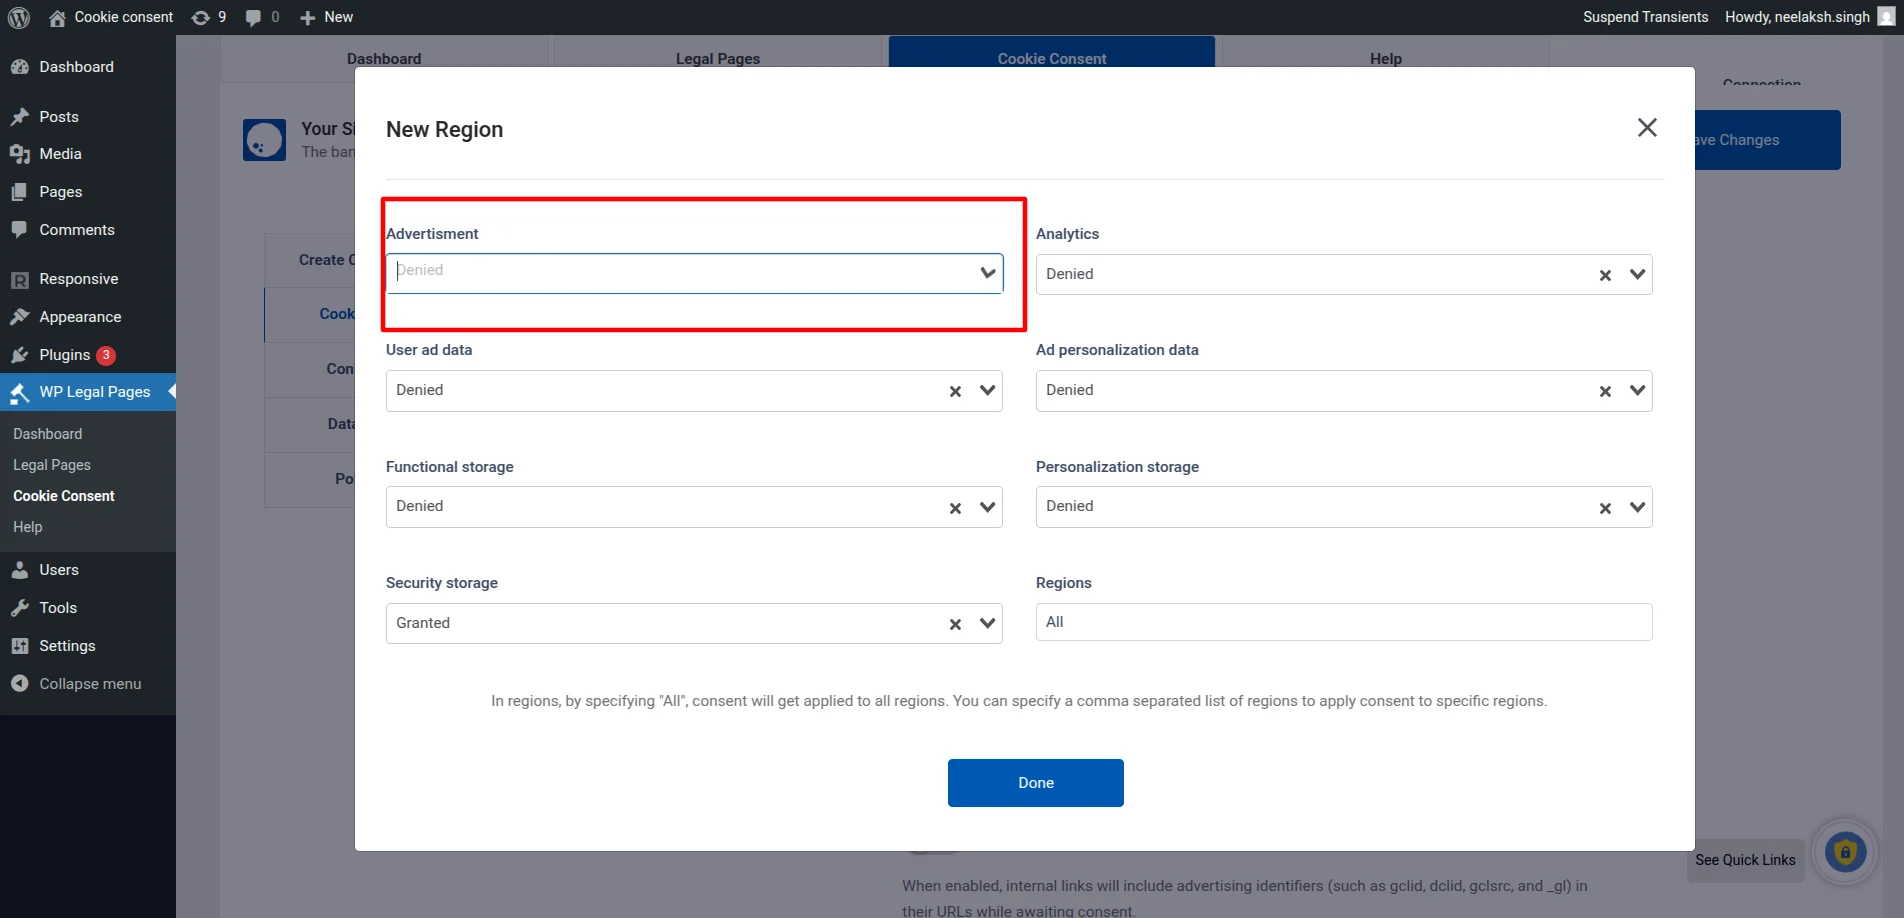
Step 3. Select Granted/Denied from the drop down for each cookie category based on your requirements.
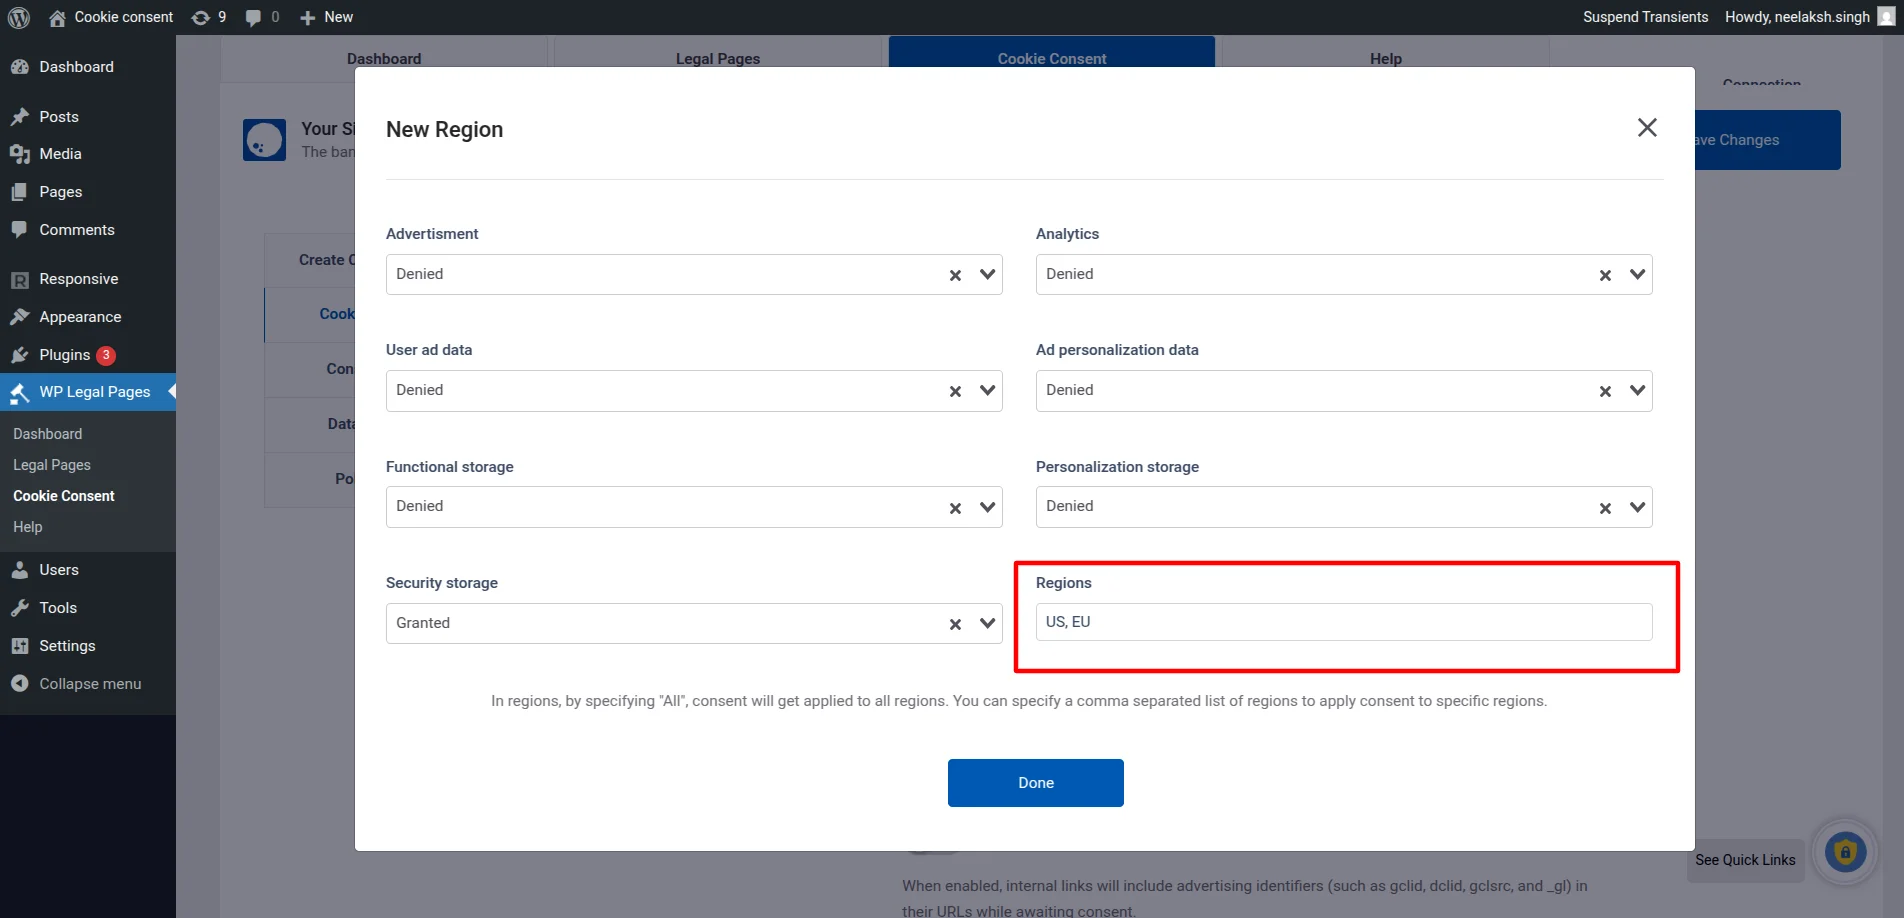
Step 4. Set the Region by entering the region’s ISO-standardised (ISO 3166-2) codes(comma separated) for the specific regions you intend to Geo-target with your banner. If you prefer not to Geo-target your default consent state to specific regions around the globe, leave the region empty. Refer to the ISO 3166-2 standard for the appropriate region codes. Click on the Done button to close the modal to save the region after you have set all the desired values.
Step 5. You can Edit or Delete any default region you have set.
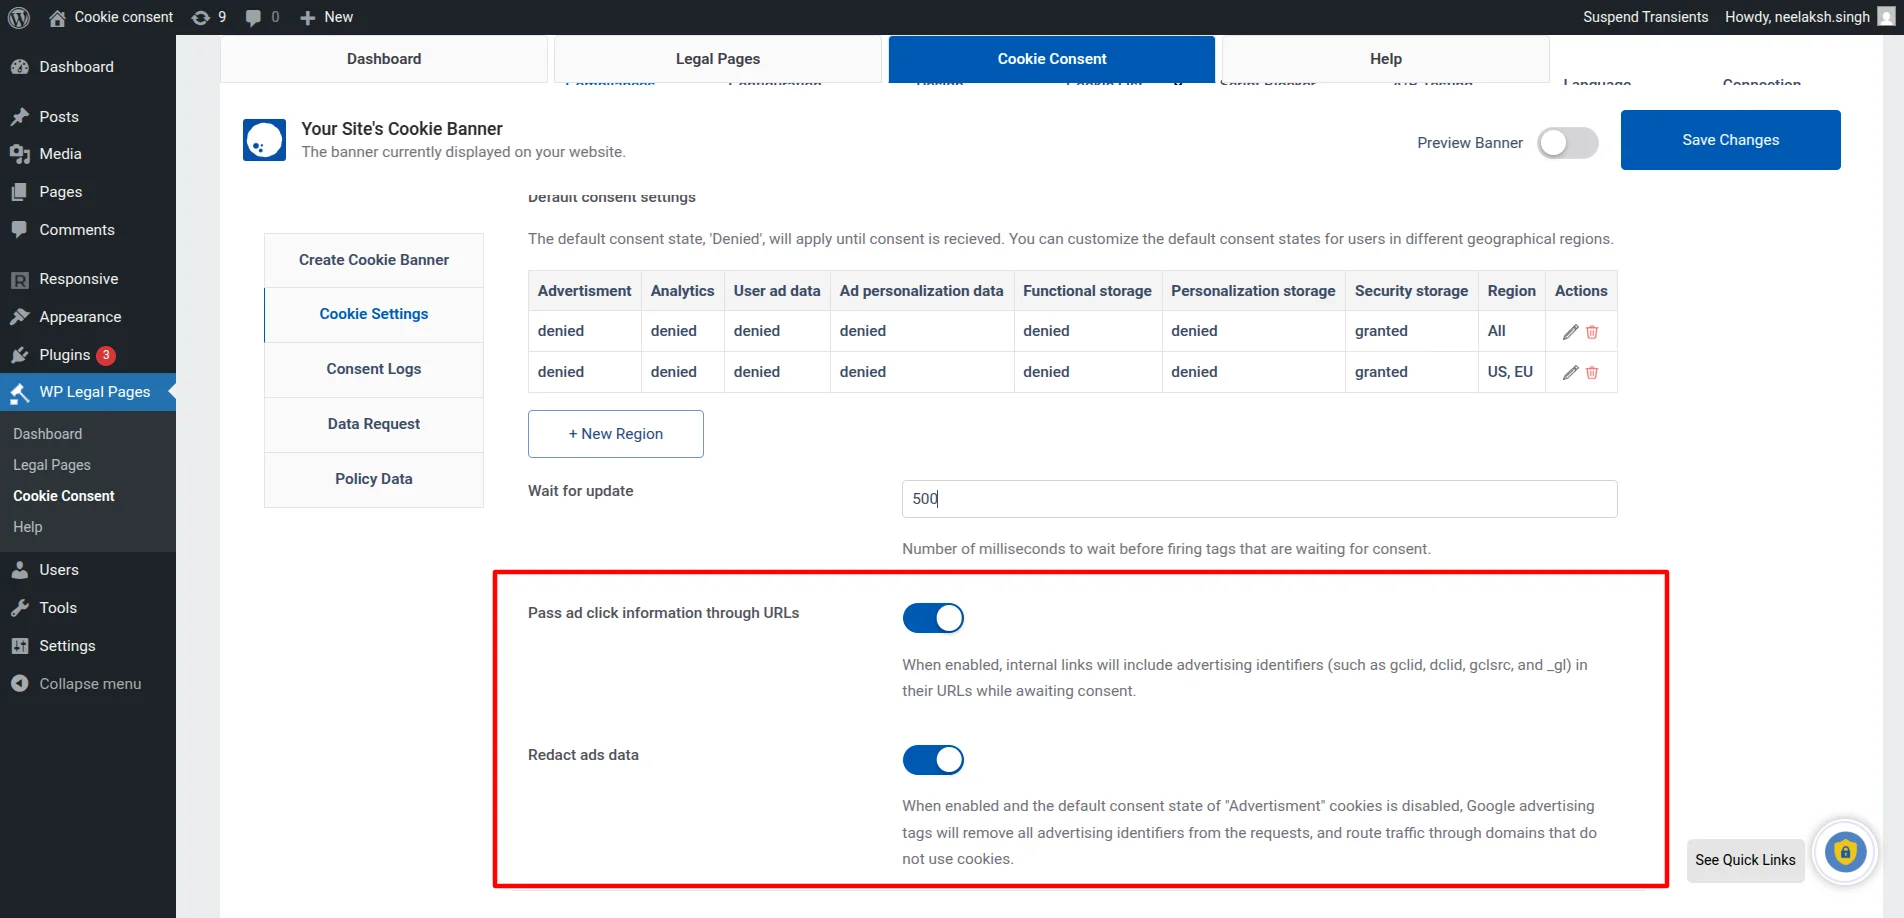
Step 6. You can set the wait for update parameter to your desired value. It is the time in milliseconds you want to wait before the data is sent to Google Tag Manager.

Step 7. You can also set parameters ads data redaction and URL Passthrough to true as per your needs.
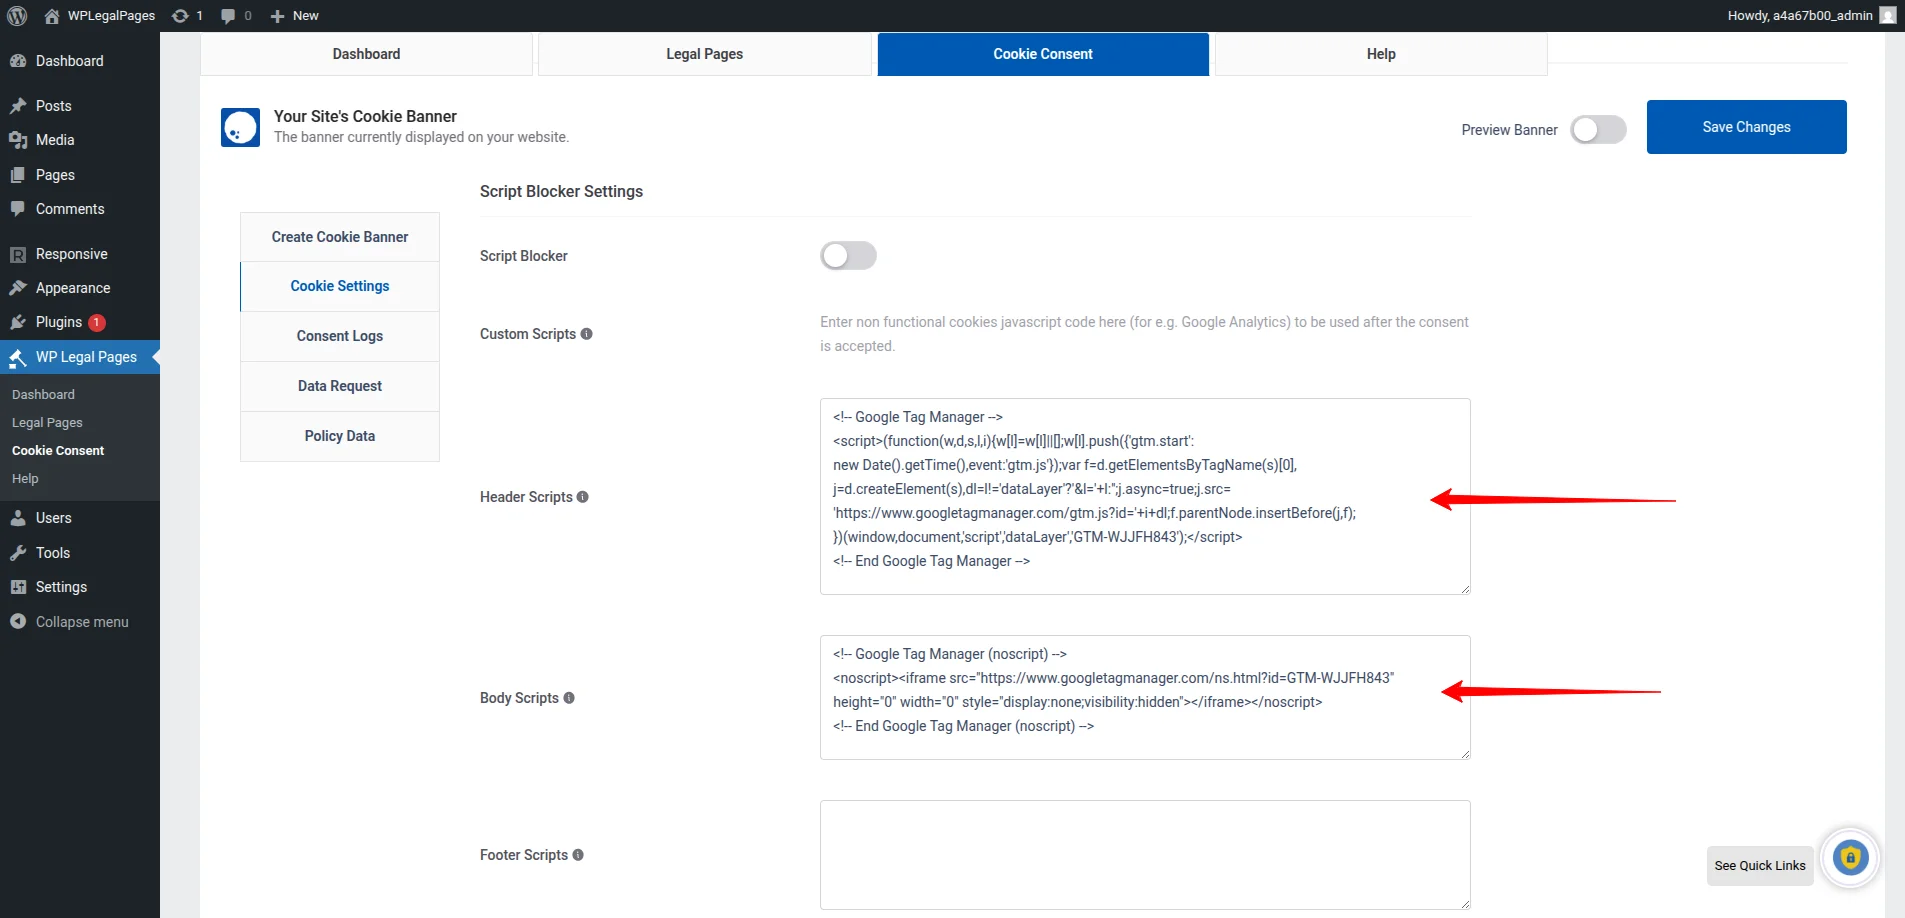
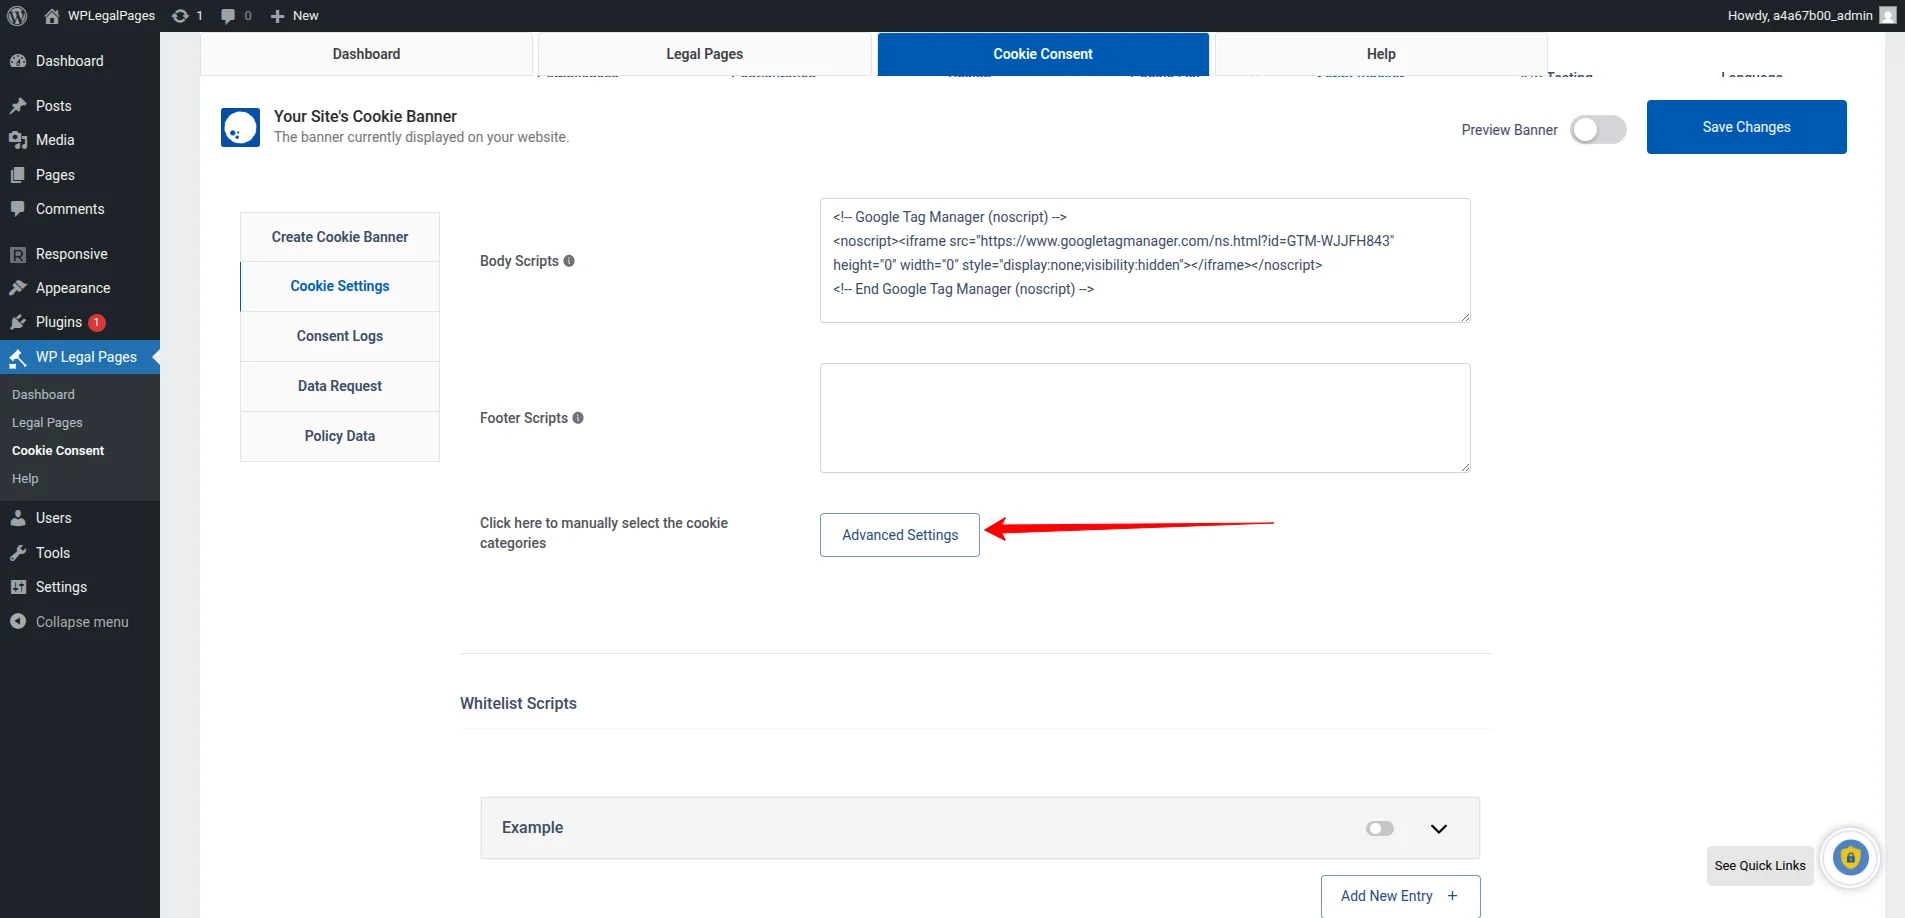
Step 8. You also need to set up Google Tag Manager for your website. You can refer to the help guide for detailed instructions. Navigate to Script Blocker tag and paste the scripts you get from Google Tag Manager and paste them in the Header Scripts and Body scripts respectively.( Paste the script to be pasted in <head> tag in the Header script text box and similarly paste the <body> tag script in the Body scripts text box. )
Note #
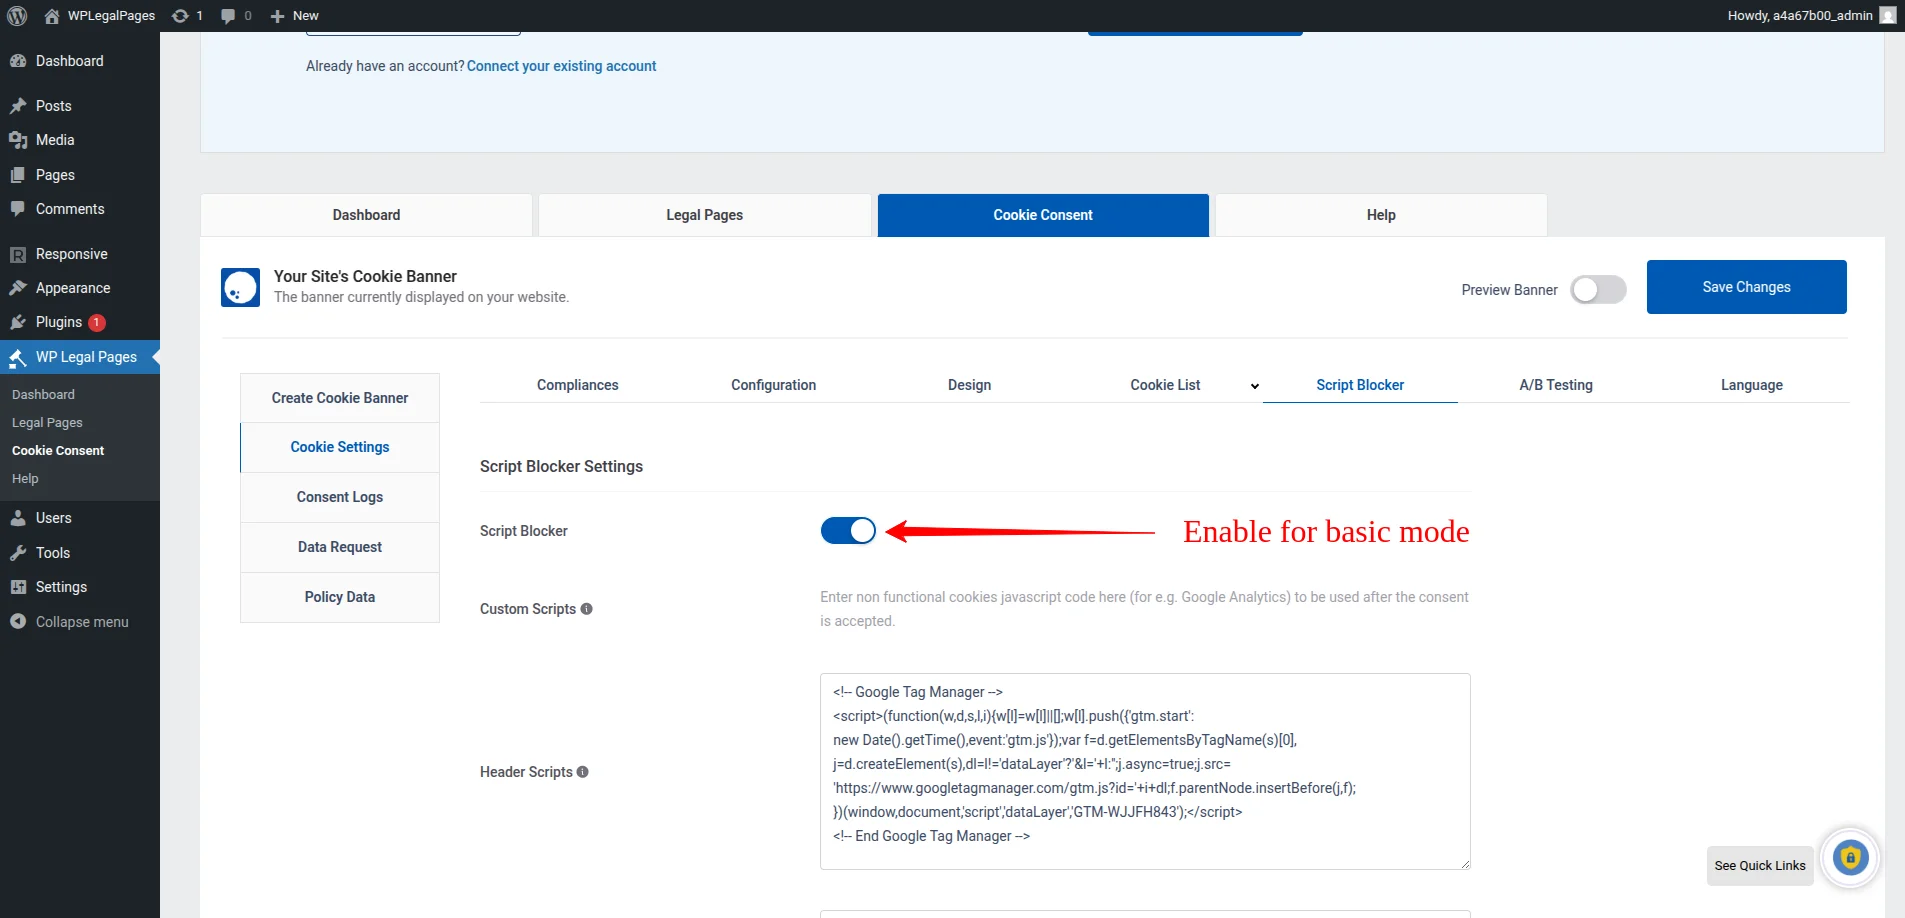
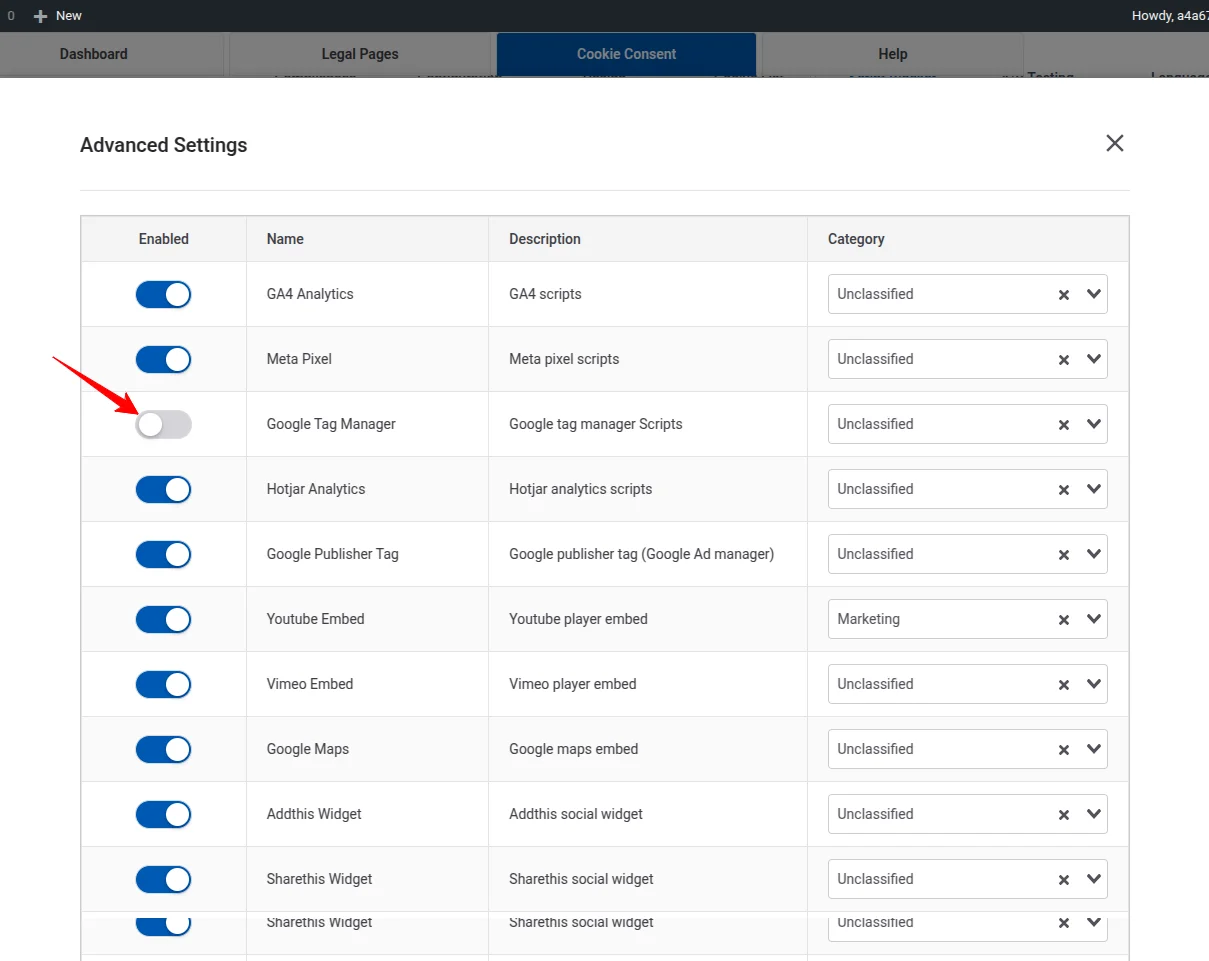
Step 9. Google Consent Mode has 2 modes: Basic Mode & Advanced Mode. If you want to use GCM in basic mode, enable Script Blocker. If you want to use GCM in advanced mode, keep it disabled.
Note #
Step 10. Click on the save changes button.
Verify integration #
To verify if your setup is working fine, follow the steps given in the guide here.
Google Consent Type #
WPLP Compliance Platform CMP maps all seven Google Consent Types into four categories.
| Google Consent Type | Consent Category |
| ad_storage | Marketing |
| analytics_storage | Analytics |
| functionality_storage | Necessary |
| personalization_storage | Preferences |
| security_storage | Necessary |
| ad_user_data | Marketing |
| ad_personalization | Marketing |
When a visitor enables certain cookie categories on your site, the corresponding Google consent types in the cookie banner are automatically set to ‘granted.’ That’s it—you’re all set!
If you found any issues or need any help, please raise a support ticket on our dedicated GCM Support page.


